Sunday, 26 November 2017

Blank ZX81 membranes and overlays

This is an old post, preserved for reference.
The products and services mentioned within are no longer available.

My Minstrel ZX80 clone kits and ZX80 membrane overlays are now available with a new type of ZX81 replacement membrane.
These are the same size and function as the ZX81 versions, but are slightly thinner and are plain black rather than having the ZX81 keyboard printed on them. They are produced for me by RWAP (who also suggested the idea), so are the same top quality as their ZX81 replacement membranes.
As with the ZX81 version, these membranes have a 3M self adhesive backing.
When removed, that shows the matrix off nicely. The ZX81 version has a white background, so you don't see the matrix as clearly. Not that it matters as you normally attach that straight to a ZX81.
However, this looks great on the underside of a Minstrel clone on a clear perspex sheet.
If you wanted to, I suppose you could use one of these to create a stealth ZX81 or TS1000.
However, in practice, you probably want to apply a stick on keyboard overlay.
And then you are back to a TS1000 with a working keyboard (complete with the TS1000 labelling which differs from the ZX81 on a couple of keys).
I have been using these on the Minstrel ZX80 clones I build in white ZX81 cases. I usually start with pretty beat up ZX81's.
Sanding the top gets rid of the scratches and dings and the raised ZX81 logo.
With these blank membranes, I have been fitting them before painting, to give a cleaner line around the stick on overlays.
You then end up with a stealth ZX80, although as before, you probably want to fit an overlay.
Available with keywords for either the original 4K BASIC
Or the ZX81 style 8K BASIC.
Finally, back to the open frame version of the Minstrel clone.
As requested by a previous buyer, this can be supplied with both overlays and both versions of BASIC so they can decided which one to use.
4K if you want to be authentic to the original ZX80, 8K if you want to use it for more things.
All these things are available now from my Tindie store.

UPDATE:
I have sold out of the blank membranes, so will be supplying standard ZX81 membranes. They look the same once the overlay is applied anyway.


Sunday, 12 November 2017

ZX Spectrum Issue 2 Colour Adjustment

This is an old post, preserved for reference.
The products and services mentioned within are no longer available.

One of the common problems you see on Issue 2 ZX Spectrums is poor colour adjustment.
This usually results in a very yellow, or very blue screen, or something in between, but usually with a strong tint of one colour or the other.
Issue 3 and later Spectrums have automatic adjustment in the ULA, but issue 1 and 2 boards suffer from this issue. The colour balance is adjusted using two potentiometers on the board, and these adjust two bias voltages, which should be the same but the inverse of each other (i.e. -50mV and +50mV).
You can do this by eye, but just turning them and watching the screen, but I always end up where it is just about right but keeps cutting out to black, and either side jumps to bright yellow or bright blue.
This issue 2 board is like many proving difficult to adjust that way. Many people seem to advise replacing all the electrolytic capacitors at this point. I'm never convinced that recapping is necessary. There are definite cases where it should be done, but in many cases I have found the capacitors are often fine, within spec, often higher than rated and not too high ESR.
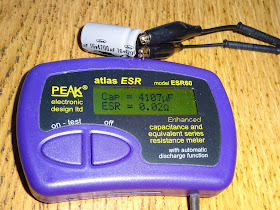
As an example, the large 4700uF capacitor in the power supply is reading over 5000uF and 0.04 ohm ESR, which is fine. You could argue it should be replaced, but only if the replacement is at least as good and likely to last, I'm not sure many modern capacitors are as good as the originals were. You see them failing so often in switch mode power supplies in consumer electronics kit. If you do find a low one, then yes, that is worth replacing, i.e. this one is reading low, so I did replace it.
Here I have tried a few things, just to make sure they didn't affect the adjustment process. The 7805 regulator was showing signs of rust, and they run hot, so I have replaced that with a switching regulator.
The issue 2 boards have the regulator on the bottom right, shown here with the heatsink removed. I did clean off the rust, but decided to replace it anyway. The normal switching regulators I use are slightly too tall, so I mounted one on it's side, soldered to a pin header.
That hasn't made any difference to the colour adjustment, when I was running from a regulated bench supply, but I didn't notice the reduction in load of the switching regulator vs the original linear one did make a difference when running on a Sinclair power supply.
I remeasured all the voltages, all seemed fine, but I decided to do the recapping anyway, almost to prove to myself that it wouldn't make a difference to the problem at hand, but is probably beneficial in the long term.
I also replaced the switching transistor TR4 as they are prone to fail. Note also C46 is marked with the + at the wrong end on these boards. It is show correctly fitted, it should be the same way around as C27 on the other side of the keyboard socket.
I had tried this via the RF and then via a simple capacitor composite video modification.
This is normally fine on a later Spectrum, but I have had problems with issue 2 boards before, where you get tearing at the top of the screen, particularly on darker screens such as the DivMMC future menu.
To get around that, I fitted a TFW8B video buffer board to the modulator to give a better composite video output and that straightened out the distorted screens.
After all that, it is still proving difficult to adjust the colour either manually, or via the official method of adjusting VR1 and VR2 to get +/- 50mV.
I had a look at the video waveform on an oscilloscope and you can see how noisy it was. I found that adjusting VR1 one way made this a lot worse.
Adjusting it the other way it was possible to minimise this noise, and the same thing with VR2, until finally it was adjusted down to get the signal as fine as possible.
When that was done, I was rewarded with a solid, stable, and very white picture on the TV.
I dug out an 'untested' issue 2 board without being recapped or composite modded or anything and tried this adjustment method, and got a good result straight away. I think it's scope based adjustments for me on issue 2 boards from now on.
Testing on various games and soak testing this was fine, although I noticed it needed readjustment when moving from a regulated power supply to the standard unregulated Sinclair supply, but continued to be fine on that over a long soak test.
As ever after a repair like this I have the horrible job of having to test out various games to make sure they play correctly. Ah well, it's a hard life.

Saturday, 4 November 2017

Radofin tele-sports TV game composite video modification

This is an old post, preserved for reference.
The products and services mentioned within are no longer available.

Before the days of the home computer in the early 1980s, the 1970s electronic entertainment of choice was a TV Tennis game, pong, tele-sports, or many other names.
This example was the Radofin tele-sports, although there were many other variants. All of these were very similar, you plugged it into the TV, tuned it in (usually UHF channel 37) and had a selection of games like tennis in glorious black and white, and later in colour.
There were two controllers, which were actually just variable resistors in boxes. These controlled the 'bats', the two vertical bars on the side. A square pixel, the 'ball' would go from one side to the other, either rebounding off the bats or sailing off the side of the screen and scoring a point for the opposition.
The reason these were all very similar is they often used the same chip, or one of the same family. Here the original AY-3-8500, dated early 1977.
The other chip is a 4072 dual 4 input OR gate which is used to combine the video signal. The rest of the unit is basically switching and analogue electronics. No microprocessor, ROM, RAM or anything like that.
You might also notice the space on the right hand side. What looks like a big selector switch is in fact an entirely mechanical scoreboard.
These days this UHF TV signal is not very compatible with a modern TV, so I have been asked to convert this to have a composite video output. It turns out the video signals generated internally are quite good, so it is just a case of locating these and buffering the output.
Here I have tapped the 9V DC supply on the red wire, 0V on the black, and the yellow taps the composite video signal as it enters the modulator. Note neither the modulator shield or the TV cable are connected to 0V. I've done a few of these, and they are all different, it's a matter of following the signal around and finding an appropriate point to tap it off.
Some boards save money on a 4072 and wire OR the signal together with diodes. The diagram isn't that clear without the pinout.
It's interesting to note the various elements are available as separate signals, I am tempted to look at making a colour version by using these to generate a red bat, green ball etc.
The original unit had the TV and controller cables hard wired in, the only socket being one of those horrible 2.5mm audio jacks used for power and one of those equally horrible multiple connector power supplies.
To make things easier, I am going to re-purpose the TV lead as a composite video output. Fitting a phono plug in place of the original TV aerial connector.
Inside, the lead was switched (maybe to reduce interference when not in use?), so I cut it a that point, leaving the original output still connected to the modulator and the switch.
I attached the end of the cable to a TFW8B video board to buffer the video signal, and mounted that on top of the battery holder.
That is fixed down with a double sided foam pad, and an extra cable tie to hold the video out cable in place. I have only connected the video up. There is audio, feeding an internal speaker. You could disconnect that and feed the audio to the TV, but it works fine as it, and would need an additional hole drilling so I've left it as video only.
With that in place, it doesn't look too bad. The picture is surprisingly good on a modern LCD TV.
You can enjoy the variety of games it offers, such as tennis as shown at the start, but also football and squash.
This is also practice, which is just a single player version of squash.