Thursday, 30 March 2017

Commodore 8096 Mainboard Repair

This is an old post, preserved for reference.
The products and services mentioned within are no longer available.

The Commodore PET 8096 and 8096-SK were unusual machines. They were basically standard 8032 or 8032-SK machines with an add on 64K RAM board.
The confusing thing is this extra RAM rarely gets used. It can only be accessed by programs which were designed to use the paging mechanism, and so far I have not found any software which actually uses it. I think Edilbert Kirk's Z-Machine-Interpreter can use it, so you can speed up Infocom text adventures such as Zork and HHGTG. It is not recognised by BASIC, so you still get the traditional 31473 bytes free message on power up. Many people would be expecting to see 96K
With the 64K RAM board removed, you have a standard 8032 board. The one in question here has a memory fault, and was previously only showing 16K. It has now stopped showing anything. and is now just showing a blank screen and no boot up chirp.
A quick test with my prototype PET LCD diagnostics board (more on that in a later blog post), shows the problem is bit 0 in both banks has completely failed. Since it is the same bit on both banks, it could point to an external problem with a ROM of data bus buffer pulling the D0 line up or down.
I checked that by enabling the RAM replacement and the system ran fine with the RAM replaced and the onboard ROMs, so the problem does appear to be both D0 RAM chips. It is possible one failed a while ago and has damaged the other, causing that to fail also as they are effectively in parallel.
This particular era of PET boards can be frustrating to work on. The pins on the back are cut very short, so it's not as easy as it normally is to desolder the chips, even with a decent vacuum desoldering station. The RAM in particular has all the tracks going between chips on the top of the board, so it is very easy to lift a pad a break the circuit when removing these.
After the first one, which took a few goes to get it clear I switched to cutting the legs of the chips and removing them separately. I don't often do this, as it is good to be able to test the chip that has been removed to ensure it's bad, but it comes down to which is more important, preserving the chip or avoiding damaging the board.
With those replaced, time to retest and all RAM passed.
Great, 31743 bytes free. Back into the box and return to the customer. Job done.
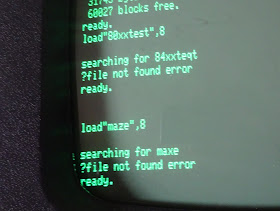
Well, no. When I tried to load programs, I was getting unusual errors. I asked it to load 80xxtest, and it says it is searching for 84xxteqt? maze leads to a search for maxe? I managed to load some programs by renaming them to a single letter, and ran some more tests.
Most of the test programs I ran passed, so I was starting to think it might be something up with the IEEE-488 hardware, but I when I tried with a ROM/RAM board installed replacing the lower RAM, it had loaded fine and not shown any of those file name mangling problems. This is why it is sometimes good to stop and walk away from a job for a while and think things through. I could have ripped out and replaced all the IEEE-488 chips in an attempt to get this working, when in fact it was fine.
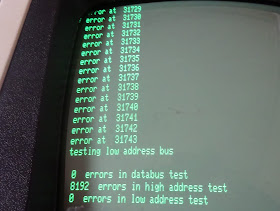
I have an old BASIC RAM test program I use as a bit of a burn in test as it takes a while to run, and repeats the RAM test in a few different ways. This passed all of the lower bank tests, and the initial tests on the upper bank data bus, but failed about 75% of the RAM on address bus tests.
What is going on here is simple tests just write the same value into each address of the RAM and then read back and check if each ones matches. This is fine in many cases, but doesn't test if you write 42 to address 12, does it appear at address 12? it could have been written to address 13, and vice versa, but the simple data test would pass either way. The address bus tests white different values into each address, 0 into address 0, 1 into address 1, and so on cycling 0-255.
32752 7FF0 0111 1111 1111 0000
32753 7FF1 0111 1111 1111 0001
32756 7FF4 0111 1111 1111 0100
32757 7FF5 0111 1111 1111 0101
32760 7FF8 0111 1111 1111 1000
32761 7FF9 0111 1111 1111 1001
32764 7FFC 0111 1111 1111 1100
32765 7FFD 0111 1111 1111 1101
Looking at those last few errors, out of 16 addresses from 7FF0 to 7FFF, 8 failed, all the ones with bit 1 low. All the addresses with bit 1 high passed. This pointed towards D1 being at fault. Here again, step back and think it through. I could rip out the address buffers and multiplexors which work on D1, but this is only affecting the upper RAM bank, the lower one was fine. Only the RAM chips themselves are split between banks, all the rest is ruled out as the lower bank is working fine. Removing the D0 chip from the upper bank turned this into a 16K machine, and that worked fine, so the problem is pointly sqarely to the D1 chip in the upper RAM bank.
With the D1 RAM chip in the upper bank replaced, the error count was reduced to 50% of the upper bank, and now only in the high bits of the address bus (i.e. write 0 to addresses 0-255, 1 to addresses 256-511, and so on).
31740 7BFC 0111 1011 1111 1100
31741 7BFD 0111 1011 1111 1101
31742 7BFE 0111 1011 1111 1110
31743 7BFF 0111 1011 1111 1111
Picking a few more addresses out that had failed, they all had 0 at bit 10, or bit 2 of the upper address. These errors pointed to D2, all the addresses which failed had D2 as 0, all the ones with D2 as 1 passed. Rather than work all those out, I thought I had a computer here, so why not use it. I modified the program to print up the difference between the value it read and the value it expected to read.
Yes, that's fairly clear, the value of 4 indicates bit D2 is faulty (wrote 254, read 250 etc.). If I had tried this previously, it would have shown a mixture of 2 and 4 (and maybe 6). Here it would have been interesting to check that, but again I had resorted to cutting chip legs to reduce the chance of damaging the board.
One more RAM chip replaced and those tests now all passed.
Files were now loading properly and no other issues were found after a long soak test and multiple runs of various test programs.
Quite an unusual fault that one, but all sorted and back with it's owner. I'll be adding address bus testing to the next version of my PET diagnostics boards. Meanwhile, more testing.

Friday, 17 March 2017

Spanish Spectrum+ 128K Repair

This is an old post, preserved for reference.
The products and services mentioned within are no longer available.

A while ago I ended up with a broken board from a Spanish Spectrum+ 128K. The first obvious issue from outside is that the large heatsink which give the 'toastrack' it's nickname is missing.
The first obvious problem inside is the ULA, which was inserted upside down, I corrected that before I powered it on.
Since the heatsink was missing, I borrowed a random bit of metal and bolted the loose 7805 onto it.
On powering it up I got a faint signal on the RF, I could just about make out the copyright notice. (this is actually a later picture after it was cleared up a bit, it was a worse than this before)
Since there were some signs of life, I replaced that regulator with a switch mode version, so no more need for the large heatsink (which I didn't have anyway).
With that replaced I could get on with the rest of the testing. The 12V rail wasn't very good when I measured it, and with the video problems, it seemed a good idea to recap this board. Not something I usually do out of course.
I also replaced the switching transistors, may as well, they have a tendency to fail on Spectrums.
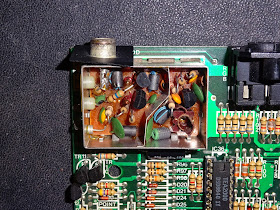
That didn't make any difference to the picture, but at least the supply rails were now stable. I thought about retuning the modulator, but when I opened the case, I found the ferrite core used to tune the frequency was broken.
I could replace that, but easier and more useful to convert that to a composite video output. There is a composite lunimance signal on the RGB port, but no composite video. I did try RGB output, but I was getting odd signals there as well. I didn't have a suitable lead as the Spanish 128K, the UK 128K and the later +2A etc. all had different RGB pinouts.
Checking the signal going into the modulator was a bit confusing. It looked like a sort of composite video signal, but inverted. The noise on the signal is the audio subcarrier, I'll remove that later.
This is from a working 128K.
I tried swapping out the TEA2000 (the colour encoder) and the ULA (for a later Amstrad version from a Grey +2), but was still getting incorrect signals.
The composite video which feeds the modulator comes from a three transistor amplifier circuit.
Checking those parts, all three transistors were working correctly and fitted the right way around (a common fault on +2 Spectrums is transistors inserted backwards). The only schematic I could find was for the later UK version, but it was mostly the same.
Tracing it back, the signal looked a lot better at the TEA2000 output. I tried removing and testing various parts of that circuit, but it just wasn't giving the right output. Eventually I decided the easiest thing to do to generate a composite video output with a simple single transistor buffer. I also removed the capacitor on the bottom of the page which links the audio signal into the composite video which gets rid of the noise on the signal.
I managed to fit the replacement circuit into the board using the existing pads, and fed the signal direct to the composite video output jack on the modulator. There is now only a single transistor, mounted the wrong way around where TR10 was.
I originally had this fed via a DC blocking capacitor, but I was getting a bit of 'wavyness' on the output, which wasn't there on the other side.
Since the output seemed to be biased around 5V by the TEA2000, I used a 5.1V zener diode, reverse biased instead of the 1N4148 originally used in the base drive of the transistor.
The signal from this was a lot more like it, and at last I had decent video output from this machine. Looks good on the LCD monitor.
The Spanish mode has some interesting quirks, it is one that requires you to type keywords in full, and has an interesting way of pointing out errors with a little bug character.
Had to be done.
There is also a bar which indicates mode (uppercase, lower case, extended etc.) which is always at the bottom of the screen, rather than inverse K/E etc.
The Spanish ROM does not have the menu like the UK 128K. Not sure if it's the official way, but typing USR 0 takes you to 48K mode.
I did try switching the ROM for the UK Spectrum+ 128K ROM, and it seemed to run OK,
I want to keep this as a Spanish 128K. so back to the ROM with the 'DERBY SP' label on it.
The original Z80 did not have any output on the M1 line, so I substituted it for another Z80, and M1 is now present and I can use a divMMC future to run some test software. (Update: the Z80 was retested in another machine and confirmed it was missing the M1 line) I also added a heatsink to the ULA.
No startup menu on this one, just the 1985 copyright screen.
Trying out or the ZX Spectrum Diagnsotics V0.33, it didn't detect the Spanish ROM, it's CRC may not be in the table, but all the other diagnostics tests passed
Update, the ROM checksum has been added to V0.35, so now it detects both versions of the Spanish ROM, this one was version 2.
And version 1 from an earlier Spanish 128K machine (using the wrong video lead, hence the bad monochrome picture).
Back to the machine under test. The colour bar looks OK, not perfect, but you're not going to get that much better with composite video anyway. The sound tests show the usual differences in level from the default beep to the AY chip, I need to adjust these at some point.
I ran this on a soak test for a while with only the ULA getting warm, so I fitted that with a heatsink. The board seems to be running OK, I didn't have the original case, so I just had the board.
The case of a 48K Spectrum+ should provide a suitable replacement. They are very similar, just a few connectors in different places.
The large case accommodates the same board which fits the original rubber key Spectrums, but there is space, for the larger 128K board. Note they still have the reset switch on wires. The 48K board in the above photo should have have a wired reset switch, but it was missing.
The power and edge connector were fine, but I had to widen the slots for the modulator connector and the RGB socket (the old ear socket).
I drilled two holes on the side for the new location of the ear and mic sockets.
The Spanish 128K models had '128K' in white next to the rainbow stripes, so I had to add that.
Some of the keycaps are different on the Spanish models, so I may try to get hold of a Spanish 48K Spectrum+ with a more suitable keyboard. Can you tell which one is mine, and which is an original Spanish Spectrum 128K?
Time for some testing.
So far, so good.
All the software I have tested seems to run fine.
Games all seem to be loading, both 48K and 128K versions.
It's hard work having to test all these things.
Finally time for another go of the newly released Pilot Attack from Misfit.