Sunday 19 January 2020

Minstrel building hints and tips

Whilst I offer the Minstrel 2 and Minstrel 3 as built and tested units, most are purchased as kits or bare PCBs. As such, you see all sorts of construction techniques and case solutions.

I've put together a gallery of photos of Minstrel builds I have been sent as a Twitter Moment. I have a feeling moments are being phased out all the integration seems to have been removed and the current version is considerably more difficult to operate than it used to be.
I'm going to start with a few hints and tips from all the boards that I have assembled. The Minstrel is a fairly conventional through hole design, that wouldn't look too out of place in the 1980s, other than maybe the tracks are a bit thin by 80s standards. I don't think I would have been able to route the board using standard thickness tracks without it being a lot larger.
Standard assembly techniques apply here, work in order of height above the board, start with the lowest parts like the resistors, capacitors and diodes. Here I prefer to solder the parts in from the top of the board. A bit unconventional, but it's a very fast technique as you don't need to keep flipping the board over, and I think it gives a nice finish as you get a decent solder fillet on the top side, rather than just the occasional blob if too much solder was used on the underside. I go through and resolder each leg from the other side of the board when I am doing the chips, that gives a nice even appearance on both sides.
The chips I also tend to tack solder the corner pin, usually the ground pin, the one which is least likely the flow through itself when the rest of the chip is soldered.
The main collection of chips on the board is a mixture of 14 and 16 pin devices. Texas Instruments use the same package for both of these, so the board is laid out to look neatest using these packages. If you look carefully, you will see the pin count of the row of chips on the right changes near the top, but all appear uniform. This is entirely irrelevant to functionality, but I think aesthetics are important too.
You can fit sockets if you like. Turned pin are recommended. However, if I'm building one for myself these days, I only fit a socket on the ROM chip. Once all the bits are soldered, I give the board a good clean with flux remover, and then with IPA to remove the flux remover residue.
With the move to HC logic on the Minstrel 3, it runs at less than 100mA, even with the Minstrel ZXpand attached, so it runs fine with a standard 7805 5V regulator without the need to fit a heatsink. You can leave it 'flapping about in the breeze', or can bolt it down, or I like to rivet them in place.
The Minstrel 2 with it's LS logic runs at more like 200-300mA, so if you want to use a 7805, you need to fit a heatsink, such as the one from a ZX81.
Alternatively, on either board, you can fit a Recom or similar 7805 switching replacement, which reduce current consumption from the supply even more and generates negligible heat.

Keyboard options

There are a few keyboard options, these days I prefer to use the tack switch keyboard with overlay PCBs. The original tact switch keyboard had a nicer feel, but there wasn't space to write all the keyboards and graphic symbols around the switches.
The membrane keyboards had all the keywords and symbols, but were not the greatest to type on. I produced a series of overlay stickers with the appropriate keywords and symbols on for 4K and 8K versions of BASIC, in ZX80 colours, that can be stuck over standard ZX81 replacement membranes.
If you are using a membrane on a baseplate, I normally fit the membrane connectors underneath the board, at 45 degrees, that way the membrane tails fits under the board.
If you are fitting the board in a ZX81 case, fit the membrane connectors on the front as with a ZX81, so the tails sit under the board when attached.
I have recently added overlay PCBs for the tactile switch keyboards. These bring the best of both worlds, as only the switch cap pokes through, there was enough space to fit the normal character, shifted character, keyword and extended keyword on each key.
The tact switch keyboard PCB is connected via a pin header and socket, for neatness, I normally fit these underneath the PCB.
If you are fitting in a ZX81 case, there is space to fit the jumpers on the top side, but I have been fitting right angle versions on the back, so they can be changed without unscrewing the case.
The ROM select can also be done like this, for a single address line anyway.
Another tip for fitting in a ZX81 case is the capacitor above the ROM chip can sometimes get in the way of the pillar, so I fit this with one leg soldered to pin 28 of the ROM socket instead, to give more clearance around the hole. You can see here I also fit the reset switch on the reverse for ZX81 case installs.

ZXpand

The construction of the Minstrel ZXpand is a simpler version of the main board, the same technique, just fewer parts.
The only potentially tricky item is the SD card socket which is surface mount, but I supply those presoldered to the PCB, so there is only through hole soldering remaining.
I recommend using the 0.1" double side pin header to solder the boards together. This gives a solid result, no chance of 'RAM pack wobble'. Start by soldering the shorter end to the Minstrel ZXpand board.
Then the longer end can be soldered to the Minstrel 3 board (or I have seen people fit a suitable socket). It does limit what you can plug in, but what else where you going to plug in?
The extra link for ROM selection can be mounted under the board, out of the way, once the connectors are soldered.
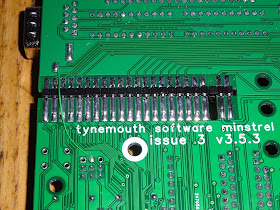
If you want to go down the edge connector route, you first need to cut down the edge connector. Two row, 23 way edge connectors have been out of production for many years, so the best option is two row, 28 way connectors that have to be cut down. These have sealed edges, so I usually leave the right hand end intact to locate the connector on the side of the PCB.
I remove two pairs of pins, one for the gap and one where it needs to be cut. Tidy up the cut end on the left with sandpaper, and then it slides nicely onto the end of the board, with the right hand end hard up against the right hand side of the board.
If you can find one, you can fit a polarising pin, or make something from a bit of PCB or card. I've removed the jumper wire so you can see better how it aligns at the edge.

ROMs

The ZXpand ROM contains various different images, to support the different versions of hardware and BASIC in use. If you are using the 4K ZX80 ROM image, either double it up to fill 8K, or place it in the first half of the 8K block. When testing you can set the A15 jumper to low and get the standard versions of BASIC.

A15 (ZXpand Select)
A14
A13
Contents
0
0
0
ZX80 4K Integer BASIC
0
0
1
ZX80 4K Integer BASIC with ZXpand
0
1
0
ZX80 8K Floating Point BASIC
0
1
1
ZX81 8K Floating Point BASIC
1
0
0
-
1
0
1
-
1
1
0
ZXpand overlay for ZX80 8K BASIC
1
1
1
ZXpand overlay for ZX81

When the ZXpand is connected, the A15 jumper is replaced with the wire link to the ZXpand board, that pin is normally low, but is pulled high when the extra ZXpand code is required.
If you ever see something like this, and the keyboard is responding and the cursor is moving, just not displaying the correct characters, have a look at the ROM settings, it is pointing at code rather than the character font.

Cases

The Minstrel board was designed to fit into a ZX81 case, however I have had quite a few people who had planned to do that come back and go for a different case option. Once built they have all said it seemed a shame to hide it away, so they wanted to go for one of the baseplates to show it off.
The boards are the same shape as a ZX81, so it will fit into a ZX81 case. If you've taken a few of those apart, you may appreciate the white rings around the two screws you need to fit to retain the board. The other three are screwed in from the back of the case.
With the Minstrel 2, it was a good use for a beaten up ZX81 case to sand it down and spray it white.
With the Minstrel 3, it should probably stay black.
I have also been sent a very nice 3D printed case for the Minstrel, which fits the Minstrel and the tact switch keyboard.
All very neatly done with the all the connectors lines up spot on.
I understand the designer is working on a version which includes the Minstrel ZXpand. If you want to make your own case, the dimension drawings are available.
I will have to stop there as this post is already getting quite long. I was going to go into some hints and tips about using the Minstrel 3, but I will leave that until next time. If you are playing along at home, make sure to have your Minstrel 3 up and running ready for the next lesson.

2022 Update: At the time of writing, there are still a few Minstrel 2 (ZX80) and Minstrel 3 (ZX81) kits (without ZXpand) available from  The Future Was 8 bit but those are the Final Edition kits, there are unlikely to be any more at TFW8b.

2023 Update: Minstrel 2, 3 and 4th PCBs, kits and built and tested boards are available via my SellMyRetro store - https://www.sellmyretro.com/store/tynemouth-software

See this post for more information - http://blog.tynemouthsoftware.co.uk/2023/08/minstrel-3-pcbs-kits-and-built-boards.html

Sunday 5 January 2020

The Minstrel ZXpand

This is the Minstrel ZXpand. It is a version of the ZXpand SD card disk drive specifically designed for the Minstrel 2 and Minstrel 3 computers.

You had better get used to me saying 'this will not work with an unmodified ZX81', as I may be repeating that rather a lot in this post and all the things it links to.
The original ZXpand (and the later ZXpand+) were designed by Charlie Robson (sirmorris), and here is one in use with a Minstrel 2. It required some changes. The existing ZX80 version worked for 4K BASIC, but a special version of the ROM was required to work with 8K BASIC on the Minstrel 2. This was great, and I know several Minstrel 2 owners who used these to great effect. The only issue was limited availability of the ZXpand boards.
You can see on the back there is an EPROM, a PIC Microcontoller and two GAL chips. Also, not visible (it is hidden under the ROM chip) is a 32K RAM chip. The Minstrel already has a 32k RAM chip, and a ROM chip with space in, so with Charlie's support the Minstrel ZXpand was designed as a cut down version without those elements, to avoid unnecessary duplication and to simplify things.
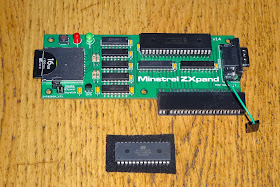
This is an early version of the Minstrel ZXpand board. There is no ROM and no RAM and the two GAL chips have been replaced with some TTL chips as they don't need to do as much. I have added a logic level shifter to the SD card interface, that's personal preference, the original was working fine using the zener diode type interface.
The joystick port was an optional extra on the original ZXpand, but can be fitted here as there is no longer a requirement to be able to fit into a Memotech RAM pack case as in the real ZXpand. The new board has been designed to sit horizontally, rather than vertically, and although you can still use an edge connector, right from the start I was expecting this to be soldered on.
Since there is no longer a ROM chip on the ZXpand board, there needs to be an extra connection from the ZXpand logic to control one of the address lines on the ROM chip to activate the ROM overlay. The ZXpand adds some commands to BASIC to control the SD card drive. There is space in 4K BASIC (another 4K in fact), but in 8K BASIC (ZX80 and ZX81), it replaces some keywords used by the ZX Printer. To do this, it uses an overlay ROM. In normal operation, the original ROM version is active, and when necessary, it switches to a version of the ROM that has extra code squeezed in where the character set normally lives.
After looking around, it was clear that the sum total of programs I could find that would i) load on the Minstrel 2 and ii) could use the ZXpand joystick was (drum roll.......) zero. That was a little frustrating, and I didn't think it would be good to make it available like that. At this stage, things sort of went on hold for a bit. There were a couple of ways forward, one was to make the Minstrel ZX81 compatible, which it now is, but, well, it took a while - see the blog post, I think I was working with the red 3.1 PCB at this time. Well, working is probably the wrong word, it never did that. I was staring at it a lot, banging my head against the desk.
There were some nice games from Paul Farrow which did run on the ZX80 8K BASIC Minstrel 2, and did support a joystick, just not the ZXpand version. They used the Kempston standard, which was actually from the ZX Spectrum days, I'm not sure if it was ever a ZX81 product, although I have seen several with ZX81 size edge connectors, the pins they used were common to the ZX Spectrum so maybe. This was a fairly simple IO port, just read address 0x31.
I was able to add that with two additional chips, one extra set of gates for the logic decoding, and an LS240 buffer and read the same joystick port as a Kempston joystick as well as maintaining the original ZXpand joystick functionality. I think I managed to get the data direction wrong on the first version, so a slight modification was required.
That worked, and I was able to use the joystick on ZX80 Kong and similar titles. The LS240 problem was fixed in the V1.4 board, which also changed the PIC to a larger one to increase the buffer size and speed up loading. Around this time, the next revision of the Minstrel 3 boards were in progress, so I held these off to release everything together.
Things happened. Projects came and went. Time whooshed by like an endless stream of deadlines.
Eventually, the Minstrel 3 was ready, this had ZX81 support, so the range of titles the Minstrel could run was greatly increased. The Minstrel keyboard and overlay PCBs had been designed, and it was coming together as it's own thing, no longer just a ZX80 clone, but now something which was ZX81 compatible, but with improved hardware.
With such a system built up, when you switch it on, you are greeted with the "Minstrel ZXpand" title on the screen.
You can use the Minstrel 3 as normal at this point, type in BASIC programs, or use LOAD "" (or just LOAD) to load from tape, but if you use LOAD "name", it will load that file direct from the SD card. CAT (which is now on the Z key) will display a catalogue of files, and DELETE "filename.extension" (shift + S) will delete a file (the extension is required here as an extra check).
What, you mean you hadn't noticed the Minstrel Keyboard overlays already had the ZXpand keywords on them?
CONFIG (SHIFT + G) is used to set options on the ZXpand. Currently, the only setting you can change is setting it to automatically start a program called menu.p from the root of the SD card at power on or reset. I used this a few times when demoing the Minstrel 2 to display a gloriously graphical advert.
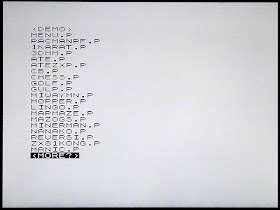
Now the Minstrel 3 supports NMI slow mode, I normally set that to use ZXpand Commander, a great little menu program that allows you to browse the SD card and load programs, controlled by joystick or keyboard.
Just browse to the program and press enter or fire to run it. That's a neat version of Reversi / Othello that I have been testing quite a bit recently. I can even beat it on level 1. Sometimes.
You can also select a program and press shift + X (or type LOAD "program;X" from BASIC) to load the program and then disable the ZXpand before running it - useful for programs that need the printer routines, or extra picky demo programs such as the 25th Anniversary demo which mostly works without it, but needs the ZXpand disabling to work perfectly.
Most of the functionality of the original ZXpand is implemented here. The exception being RAM selection. The Minstrel 3 has a fixed 32K of RAM located from 8-40K, and cannot be switched to 16K-48K as the ZXpand could. That would have required another logic gate and one or two additional link wires from the Minstrel ZXpand to the Minstrel board, and so far I have not found anything which needs the alternate RAM mode. The Minstrel 2 has a fixed 16K from 16-32K, so also does not change. The AY sound and serial interface of the ZXpand+ are also not available here. If you need those, get a ZXpand+.
The joystick can be accessed in three ways, to give a good chance of compatibility. Most 1980s games did not support joysticks, but modern ones implement a few different options. Games such as Paul Farrows flicker free ZX80 games can use the Kempston interface, press C to change the control type on the main screens.
You can now move around the screen and can no longer blame your poor scores on your membrane keyboards.
As well as the Kempston interface added to the Minstrel ZXpand, the two original ZXpand methods are still available. Games from Revival Studios, such as Down, use the ZXpand joystick interface (which is a two stage IO call, "please read the joystick", followed by "now give me the value"). This is one of my favourite games, on here and on the Commodore PET, very playable on both systems, even more so with a ZipStik plugged in.
Any BASIC programs which use the INKEY$ command to read the keyboard will also now benefit from joystick support as the INKEY$ function is also replaced in the overlay ROM. The Minstrel ZXpand can be configured as to which key will be pressed for each direction using the CONFIG command. Hey ZX81 Adventures, can we have joystick support for Tut-Tut?
Other programs will unfortunately not support any of these methods, but you can still play on the keyboard.
Jeff Minter? I wonder what became of him?
There are jumpers to disable the Minstrel ZXpand, and also the Kempston port, should you need to. I've not found one, but there may be a game out there which supports Kemston and ZXpand and could get confused.
I am very grateful to Charlie Robson for his help in the development of the Minstrel ZXpand, and allowing me to produce these so all the Minstrel owners can now load from SD card. Ah, there's the alarm bell, time for another reminder. This will not work on an unmodified ZX80 or ZX81. As the ZXpand is still a commercial product, I will not be providing download links for the PIC firmware or ROM code, so there will be no PCB only option, I will also not be including a schematic in the datasheet.
The Minstrel ZXpand will be available either as a kit with pre-programmed chips, or fully assembled. All parts are standard 0.1" through hole, with the exception of the SD card socket. I'll solder that to the PCB on the kit versions ready for you, so no surface mount soldering is required. They come with a replacement ROM for the Minstrel 2 or Minstrel 3 which contains the ZXpand ROM code. There are three versions on there, one for ZX80 4K BASIC, a special version for ZX80 8K BASIC (which does not use slow mode for CAT), and a ZX81 version.
There are a few options, turned pin sockets for all chips (which seems to have been popular with the Minstrel 3 kits) or just for the PIC. There is also the option of an SD card which I will preload with a few sample titles and the ZXpand commander.
I recommend using a dual row pin header to solder the board permanently to the Minstrel 3 board. This seems the best option to use for a reliable connection. You can order the kit with an edge connector if you prefer, but it will need to be cut down as they don't make the correct size for the ZX81 edge connector any more.
I'll have to do that if you order the assembled version. I do those by cutting off one end, and leaving the other still closed so it is aligned by the edge of the PCB.
The ROM select wire comes with a three way pin header than plugs onto the top three pins of the ROM address jumpers. The lower two blocks set the system type (ZX80 4K/8K for the Minstrel 2 or ZX81 for the Minstrel 3). This will probably be an issue if you want to use this with a ZX81 case, so it's probably best not to do that, and look for an original ZXpand with the ROM built in. I'm not even going to show a picture of that arrangement here just in case anyone thinks the Minstrel ZXpand would work with an unmodified ZX81 (which of course it won't. Did I mention that?)
A Minstrel ZXpand kit has also been added as an option to the Minstrel 3 listing, so you can now build the whole thing as one complete matched unit. Looks rather splendid, doesn't it.
You can also get a blue version for the Minstrel 2, it's the same board just a different colour soldermask.
You can then have your Minstrel 2 all colour matched.
So, that's the Minstrel ZXpand. Available from my Tindie store now (← that was the link to go and buy it).

Suitable for the Minstrel 2 and Minstrel 3. Not suitable for anything else. Really, I mean, it just won't work. I'm not just saying that. It won't, the firmware is different, the overlay ROM is not on board. The RAM is not there. Half of the decoding logic isn't there because it's already on the Minstrel board. Listen...... No, look..... Oh, whatever....... No, it's clearly not wide enough to fit behind an Amstrad CPC 464............No, it will not work on a TS1000 (or a T-1000) or a TS1500 or a Lambda 8300, or a Commodore PET or an Altair 8800 or on anything else, and let''s be absolutely clear here, even if it looks like it might fit in the hole in the back of the case, it still won't work.................OK, OK, I admit it. If you disable the ZXpand section completely, then only the Kempston joystick interface would probably work on a ZX81. But that's your lot mush.

2022 Update: We did a final run of Minstrel 3 with the ZXpand kits, as part of the "Final Edition" runs. Those have all sold out now, so there will not be any more I am afraid.

2024 Update: Minstrel 2, 3 and ZXpand kits are available from my Sell My Retro store