This is an old post, preserved for reference.
The products and services mentioned within are no longer available.
This had one important advantage over the 5200, it could play 2600 games. Inside this early NTSC unit, there was a lot in common with the older console.
Under the usual Atari metal can held in place with bent tabs lives the 7800 main board.
There are more chips than the 2600, but it's main three chips are still here.
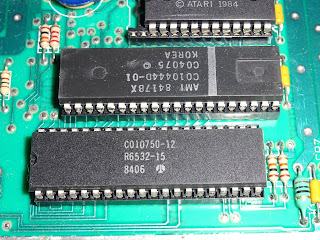
The 6532 RIOT and C010444 TIA are the same chips as used in the 2600. (yes, that is the NTSC TIA, this is an NTSC model, the PAL ones seem thin on the ground these days).
The 6507 CPU on the 2600 is now a full size 6502. Above that is 'Maria', the new sound and video chip.
This is complemented with 2x6116 2K RAM chips and a ROM chip.
This is a 1984 NTSC version of the 7800, which comes with an expansion connector on the side. I don't think anything ever used this, and it quietly disappeared from later versions.
One last thing before I get onto the composite video modification is the power connector. On the 7800, they have gone for a rather unusual 2 pin power connector.
The PSU that came with this NTSC machine was 120V, so I wanted to replace it anyway.
I went for a 2.1mm DC jack, wired for centre negative, like the Spectrum, Commodore 16, and my Minstrel ZX80 clones, so I could use the same power supplies as all of those.
The AV section, is fairly similar to the 2600 Jr, the large red variable inductor will be familiar to anyone that has been inside a 2600.
Here the circuit has two sets of inputs, one from Maria, and one from the TIA. Once those are combined, the composite video feed to the modulator is much the same.
The modification are likewise similar to those I do on 2600 Composite video output modifications.
The parts to be removed are circled on the board.
Seen here on the schematic, removing Q1 and L2 disables the audio carrier oscillator. Removing R3 separates that section from the combined video signal. Removing R5 and R6 disconnects the two audio sources, and provides a point where the two decoupled audio signals can be tapped. And finally, removing the modulator provides a point where the new AV buffer board can be fitted and the power and video connections can be made.
I am using the 'Deluxe Composite Video Mod' from The Future Was 8 bit. My thinking behind giving that board removable connectors again comes in useful. The pre-wired cable just needs to be cut to length and soldered to the board.
The white lead is the audio, and is connected to the bottom of R5 and R6, to get both the TIA and Maria audio. (I left the tinned wire at the end long enough to solder to both pads under the board).
That was nice and easy. The only thing to be wary of is you need to position the AV jack slightly forward of the edge of the board, so that the 3.5mm jack can sit firmly home when the case is refitted.
It seems that PAL 7800 cartridges don't work in NTSC 7800 systems, the logo appears, but then it just gives stripes. (could also be Maria or the RAM at fault, I'll retest that when I have some NTSC 7800 cartridge to hand).
I didn't have any NTSC Atari 2600 cartridges either, but I make a board that I could fit an EPROM into, so I burned a few to test, and it's working nicely.
Time for more arduous testing. It's a hard job, but someone has to do it.
This is the 1984 NTSC version on the Atari 7800. The PAL version, and later NTSC version are slightly different boards, but the principals are the same, just locate those components and fit the board in an appropriate location. - see the same conversion on a later PAL Atari 7800.


