Publishing software on cassette in 2022 presents some unusual challenges. I am not sure how they did it back in the day, but it turns out traditional audio cassette duplication isn't really suitable.
When we were starting out with the Future Was 8 bit 499 range, we looked at various options, the most obvious seemed to be create a master tape and duplicate it.
Creating master tapes from WAV files turned out to be a bit patchy, not a reliable result, and not a great candidate for a master to be duplicated further (and likely get worse). The master tapes created by saving the file from a real computer were always fine, those were written using good old Commodore Datasette drives.
I looked into a few different mechanisms to drive a datasette from a tap file. I tried adapting the arduino based board which can load files into a C64, which sort of worked, but I wasn't happy with the results, I wrote a program which ran on a PET, this was fine with plain files, but couldn't cope with fast loaders. Finally, I turned to an old piece of DOS software, ptap, which seemed to be the best option. This needed a 'proper' parallel port, i.e not a USB one, one using low level hardware wired direct to the pins.
It also need 'proper' DOS, not just a DOS shell in Windows, both for unrestricted access to the parallel printer port, and also for timing so it wasn't interrupted by system tasks and other programs. The easiest way to get that and a proper parallel port was to use an old laptop running DOS or Windows.
Here I resurrected an old Toshiba Satellite 210CT (remember when laptops were grey?). The original hard drive was noisy and not in the best of health, so I started afresh with a 1GB compact flash card in an adapter to fit directly into the 44 pin connector for the old 2.5" IDE hard drive.
The external (proprietary) floppy drive wasn't working, but I managed to find an old bootable Windows 98 SE CD.
It was a long time since I had seen that screen, but was soon greeted with the good old logo.
And finally the welcome screen. Windows 98SE is my favourite choice for older machines, as it is pretty solid and functional, and since this laptop was "designed for Windows 95", by the time Windows 98SE came along, all the required drivers for the previous era of machines were included with the OS, so I didn't need to find any drivers for anything, it just worked.
I took out the CF card and used a USB CF card reader to copy over the ptap files and initial tape files. That is OK once, but I didn't want to have to keep taking the CF card in an out to copy new tape images on. This laptop is pre USB, and although Windows 98SE does support USB it is frustratingly difficult to get a USB storage driver to work. The floppy was out of commission anyway, but that would have been a faff to write to write files with a USB floppy then copy them back with the Toshiba external floppy.
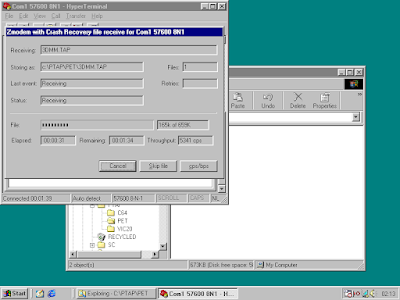
In the end, I went for a nice simple option of using RS232 serial file transfer. Windows 98 came with Hyper Terminal, which supports Zmodem file transfer.
At the modern PC end, Tera Term can send and receive a number of formats including Zmodem, so I pointed them at each other and pressed go.
It's not very fast or efficient, but in most cases I am transferring one or two tape images of a few hundred KB each, so it's no problem and saves messing around with anything else.
Out of interest, I did take the above screenshot on the laptop and sent it back, it was a 1.4 MB BMP file which took about 4 minutes to transfer.
With all the files transferred, time to fire up ptap.
Very nice. I am told the coloured flashing bars showing data only work on the oldest of video cards. Thank you Toshiba.
So that is the master tape generated, and it loads perfectly on all the machines I tried it on. You always get the best result using hardware designed for the purpose. The datasette is pretty much direct drive of the tape head. From the digital signal on the parallel port (or from a Commodore computer), all there is are a few 74LS14 inverters to buffer the signal and drive the write head. No audio filtering or automatic level controls to mess up the signal.
The trouble was, the audio duplicators are full of audio filters and automatic level controls etc. After various duplicators were tried and rejected, we gave up on the two stage approach of creating a master tape and then duplicating it. What we now do is create lots and lots and lots of master tapes. To enable this, I have built various buffering boards to feed multiple datasette drives from the one parallel port output.
I think there is a whole blog post to be written on powering and driving datasette drives, so expect that to follow shortly.
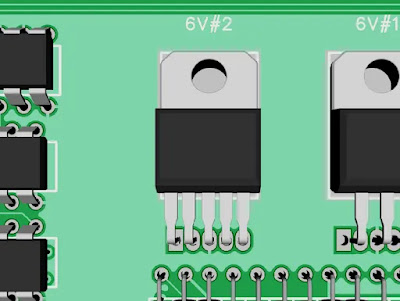
That version added individual 6V regulator for each datasette's motor power. The latest also adds a second 5V regulator as it turns out TFW8b was running the boards from 12V instead of 9V as designed, so the single 5V regulator was getting a bit warm. (Each drive uses 25-50mA on the 5V rail and 100-200mA on the 6V motor.)
All TFW8b then needs is a small army of datasette drives, which luckily, they have.
And in no time at all* you have a box of perfectly duplicated master tapes.
* actually it takes an awful lot of time
Making a stand alone unit
I've built a few rigs for this, most of which have gone down to TFW8b to be used for mass tape duplication. The one I had left was quick lash up based on an old Mini PET PCB, built to quickly test a change to one of the VIC20 fast loaders.
That was a bit unwieldy, so to test out the 3D Monster Maze and Tut-Tut masters, I thought I would do a better job.
I decided the neatest solution would be to integrate the controller into a datasette case, and keep it all neat and tidy.
For that I need a datasette, and for a change, rather than the usual 1530 / C2N datasette designed for VIC20s and Commodore 64s, I went for a 1531 datasette, the dark themed version for the TED series of machines.
Here are four suitable candidates out of the 'broken' box. These were all a bit ropey and non-functional.
This one had a squashed plug and a broken tape counter.
This one had a fantastic inline splice. I decided to start with that, and opened it up and rewrapped all the connections. One of the other drives had come with a cassette in, so I borrowed that and tried it out.
And it started loading....
It didn't finish though, it got to the end of the tape and failed. But that was good enough for me, perfectly normal for a tired datasette. The same reason why most of these drives fail. Loose belts and dirty heads.
In many cases, you can get away with just using a head cleaner cassette -
https://www.thefuturewas8bit.com/tapeclean.htmlIn this case, I could see the drive was a bit manky, so I stripped down the drive, cleaned the heads and fitted a new belt.
Belts for these drives are easily available, of course I get mine from TFW8b.com -
https://www.thefuturewas8bit.com/shop/commodore/commodore-spares/c2nbelt.html I find the easiest way is to unscrew and lift up the PCB, and then there is just this plate to deal with. I under the screw on the top and loosen the screw on the side and rotate it up so the belt can slip out the slot in the side.
Whilst you have it open, also run some IPA over the play and record heads. and clean up all this beastly mud and oomska.
Do not touch the azimuth adjustment on the head. The only time I ever have to adjust the azimuth screw is when someone has previously fiddled with it and adjusted it away from correct alignment. It is almost always perfect as it is. Just forget about it, clean the heads and replace the belt and it will fix 99% of drives.
And there you go, first time I tried after that, Space Sweep loaded. A very colourful and action packed game it would appear, might have found it out more I had a C16 joystick to hand, but I didn't, so back to the drives.
I went through the other drives, and all were found to be functional. One the motor wasn't moving, but a quick turn by hand and it started and is still running fine. A new belt and a clean head and it loaded.
I like to label up the ones that have had new belts and a bit of a clean up.
But I also kept one as is, without cleaning the heads or replacing the belt. It worked well enough to load a tape. I keep these for testing master tapes on 'representative hardware', i.e. ones that haven't been cleaned up to serviced, just like the ones the people at home might be using.
I was left with the one with the mangled plug, I wasn't able to save it, one of the pins had broken off, so I cut it off and borrowed the end of the cable from the drive where it was twisted on.
This is not the approved way of testing things. Don't do this!
Again it worked well enough and actually loaded, so I was left with a drive that had a damaged plug on the end of it's lead that I had cut off. It also had a broken tape counter, and I was able to take one from a damaged 1530 drive.
Now onto the conversion process. The datasette drives need two power supplies. The first is a fixed 5V used for the logic and the opamp. I plan to power the drive from a 9V DC supply (the same used on the Minstrels, Mini PETs etc.).
The datasettes use about 25mA on the 5V rail, rising to 50mA when recording, so I went for a simple TO92 regulator rated for 250mA. I wired that up with all the parts soldered directly to each other, and used heatshrink to separate the wires. Not exactly the neatest solution, but you haven't seen what I did for the motor yet, so appreciate this whilst you can.
The next one is a bit complicated. It should be a 6V supply, but only active when one of the keys are pressed. Some similar cassette mechanisms (e.g. the ZX Spectrum +2) have a leaf switch which is activated when a key is pressed, and that switches the negative connection to the motor.
You can see here on the right the Commodore drives also have a leaf switch, but these are only used as a logic input, so I wasn't sure if they were rated for the motor current. I expect they are, but I wanted to play it safe. Also, the switch is used as an input to the computer to tell a button is pressed. This is pulled up to 5V, and grounded when a key is pressed. I have used this input to control the shutdown pin of a regulator before, but the ones I was using have an active low output, so would be off when the button was pressed, so I had to use an inverter.
I didn't want to have to add an IC or a transistor to act as an inverter, so I went for the other 6V regulator circuit I had been using on the Mini PET.
This uses the 8 pin DIP package regulator, set to 6V using the two feedback resistors. I implemented that as very much a 'point of load' regulator. Soldered, as it was, directly to the top of the motor. These are rated for 250mA, and I have found they generally run cold even when the motor is running, and draws about 100mA. (my original plan had been to bolt 7805 and 7806 regulators to the metalwork somewhere, but it turned out neither were necessary).
All I needed to do then was to tap onto the 'sense' wire which is connected to the switch. I also added a pullup resistor to 5V, rather than relying on that happening somewhere inside the laptop.
I retained the original seven core screened cable, and attached two of the now unused wires to a short piece cut off the end of a 2.1mm DC jack extension lead. The rest of the wires attached to the 25 way D connector for the parallel port.
With the cover installed, it looked quite neat.
Less so inside the unit.
But it was starting to look tidier once it want back into the case.
Before I closed it up, I wanted to check it was all working, so I tried a few tapes and the motor spun when it was required to, and was able to fast forward and rewind.
Once I was happy the mechanism wasn't going to chew tapes, I tried a 3KHz test tape. I captured the digital output from the back of the drive.
It averaged 3.001KHz, that's probably a fluke, but it shows it's around the right speed, 2.98-3.02KHz is more than close enough.
Time to introduce it to the Windows 98 laptop. On reflection, I should have cut the cable shorter, but it's too late now.
Time to write a tape, so I grabbed a brand new C20 cassette -
https://www.thefuturewas8bit.com/shop/media/c20.html I booted the laptop to DOS and ran PTAP.
When instructed, I pressed play and record and the LED came on.
That all seemed to work, so over to the Mini PET to try and load it.
3D Monster Maze loaded first time, and I found the exit first time I played it, so that must be a good sign.
You may ask why I was loading from tape 2?
Where do you think I stole the MIC2951 regulator from? The lead time on those is currently a rolling six months, so I'd better get used to it (or swap it with the one from tape 2 which is more sensible).
It wasn't released when I started these posts, but the reason I was running the tapes was testing out my PET version of Tut-Tut.
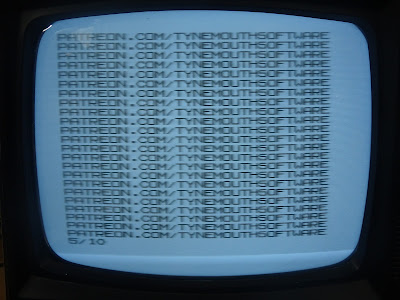
Hey, I took a picture of a CRT and it wasn't totally awful!
That's running nicely on all the hardware I tested. This is the point where I specifically try to use tatty unmodified datasettes to try out the worst case someone might have at home when they try to load a tape.
Bonus!
When I was writing up these posts for Patreon, it occurred to me that I quite liked that laptop, and I should maybe see if I can find a similar model on ebay to fix some of the issues.
And here it is, £30 of broken 90s laptop (half of which was shipping).
This was a 210CS, a lower model with a worse screen (the 210CDT has a nice TFT panel). It is also the CS not the CDS, so comes with a floppy drive, rather than a CD ROM and an external floppy drive in an external enclosure (the type where you can swap the floppy into the laptop, but you can't then use the CD externally).
The laptop has some video card issues, lines on the screen. I tried an external VGA monitor, and could switch between them using the FN keys, but the VGA output was no better. I'm not too bothered about that, I'm just putting that aside as a source of spares for the future. What I am interested in is the bits I can transfer to the other laptop.
I was hoping the floppy drive and battery would be in better condition than mine. As a bonus, I got a broken hard drive and a Sportster 28.8 modem. It's no wonder IBM got out of the hard drive game, if you have to put warnings like this on your drives, you are doing something wrong. People are going to pick it up, rattle it and say "oh yeah", and quite possible damage their drives in the process.
The star of the show however is something I didn't expect, and never thought I would find. The exact proprietary 16MB memory upgrade module.
That's right, my Windows 98 laptop now has 32 whole megabytes of RAM!
The hard drive was not detected, and was making the usual clicking sounds you get from IBM drives like this and the 'deathstar' 3.5" versions. No real loss there, I'm happy using the CF card, and I have piles of old hard drives.
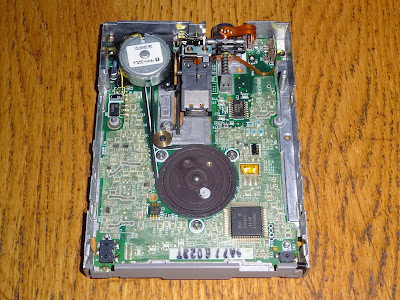
The floppy drive did the same as the previous one unfortunately. The ominous sound of a motor spinning freely, indicative of it no longer attached to anything. I had been hesitant to take the previous drive apart, as there looked to be lots of plastic clips that could easily snap, but I thought I would have a look at this new drive and see if it could be repaired.
And indeed, as unlikely as it may seem, this is an early enough 3.5" drive that it uses a belt driven spindle. And the belt is old and stretched and hanging loose, but at least not turned to black goo as they sometimes do.
I tried to replace it, but I didn't have a suitable belt. It needs to be flat profile, and the only one I had that would fit was square profile, so it rubs. It does spin and tries to seek, but all I get from Windows is "Device is not ready"
I'll keep looking for a suitable belt (found one on a US site, but shipping is complicated these days). I suspect if I were to look for another drive it would likely be in the same state, and it's a proprietary undocumented flat flex with combined power and data, so no easy path to a replacement. It would be useful to have a floppy drive available, so I will keep looking.
No immediate plans for the PCMCIA Faxmodem. I thought it would be useless without the lead, but it turns out it has a neat pop out RJ11 connector. It's still pretty much useless these days unless anyone is running their own dial up server.
The battery is better than the one I had, this one charges and runs for several hours, so I'll keep using that one. But the clear winner is the memory module, it was worth it for that alone.
Advertisements
The TFW8b produced cassettes are available here:
3D Monster Maze - https://www.thefuturewas8bit.com/cas022.html
Tut-Tut - https://www.thefuturewas8bit.com/cas024.html
All the rest of the tapes and cartridges - https://www.thefuturewas8bit.com/shop/games.html
Digital downloaded are available form my itch page: https://tynemouth.itch.io/
This post is an combination of several posts from my Patreon. If you want advance previews of posts like this and behind the scenes progress on new projects, you can follow along and support me on Patreon:
https://www.patreon.com/tynemouthsoftware