
Most PCs are built the same way around./p>

On the front you get the power button, a few USB ports and LEDs, and some optical drives.

All the interesting stuff is hidden around the back where you can't get at it.

These pictures are from 2011, the first time PC I built in this Fractal Arc Midi case. It has since been rebuilt a couple of times, most recently in 2014 with a Haswell i5 which is still running nicely, so no plans to upgrade that.

The problem still stands that it's a bit of a pain to get around to the back of the PC to plug something new in. The answer is to turn it around. I modified a PC like that back in the 90s, when I needed access to lots of parallel and serial ports on the back of the case. That was a more traditional case with the power supply at the top, so I swapped that to where the optical drives went and fitted a sheet of metal bolted in where the power supply went with the power switches and LEDs, fan controls, 4mm terminal posts wired to the power supply etc. I can't find any pictures of that unfortunately. This one should be easier as the power supply is out of the way at the bottom of the case, so it can stay where it is. The optical drives don't get much use, so I can just use a USB DVD ROM drive whenever required

The front panel still needs to be sorted though. I don't use the audio jacks, so can safely ignore those. The USB ports are handy, but there are already lots of those on the back. However, I use lots of USB devices, so with a few extra brackets, I can redirect the front USB ports to the rear of the case.

This also gains an extra USB3 port as the original front panel wasted one with a single socket even though the internal USB3 connector is capable of providing two.

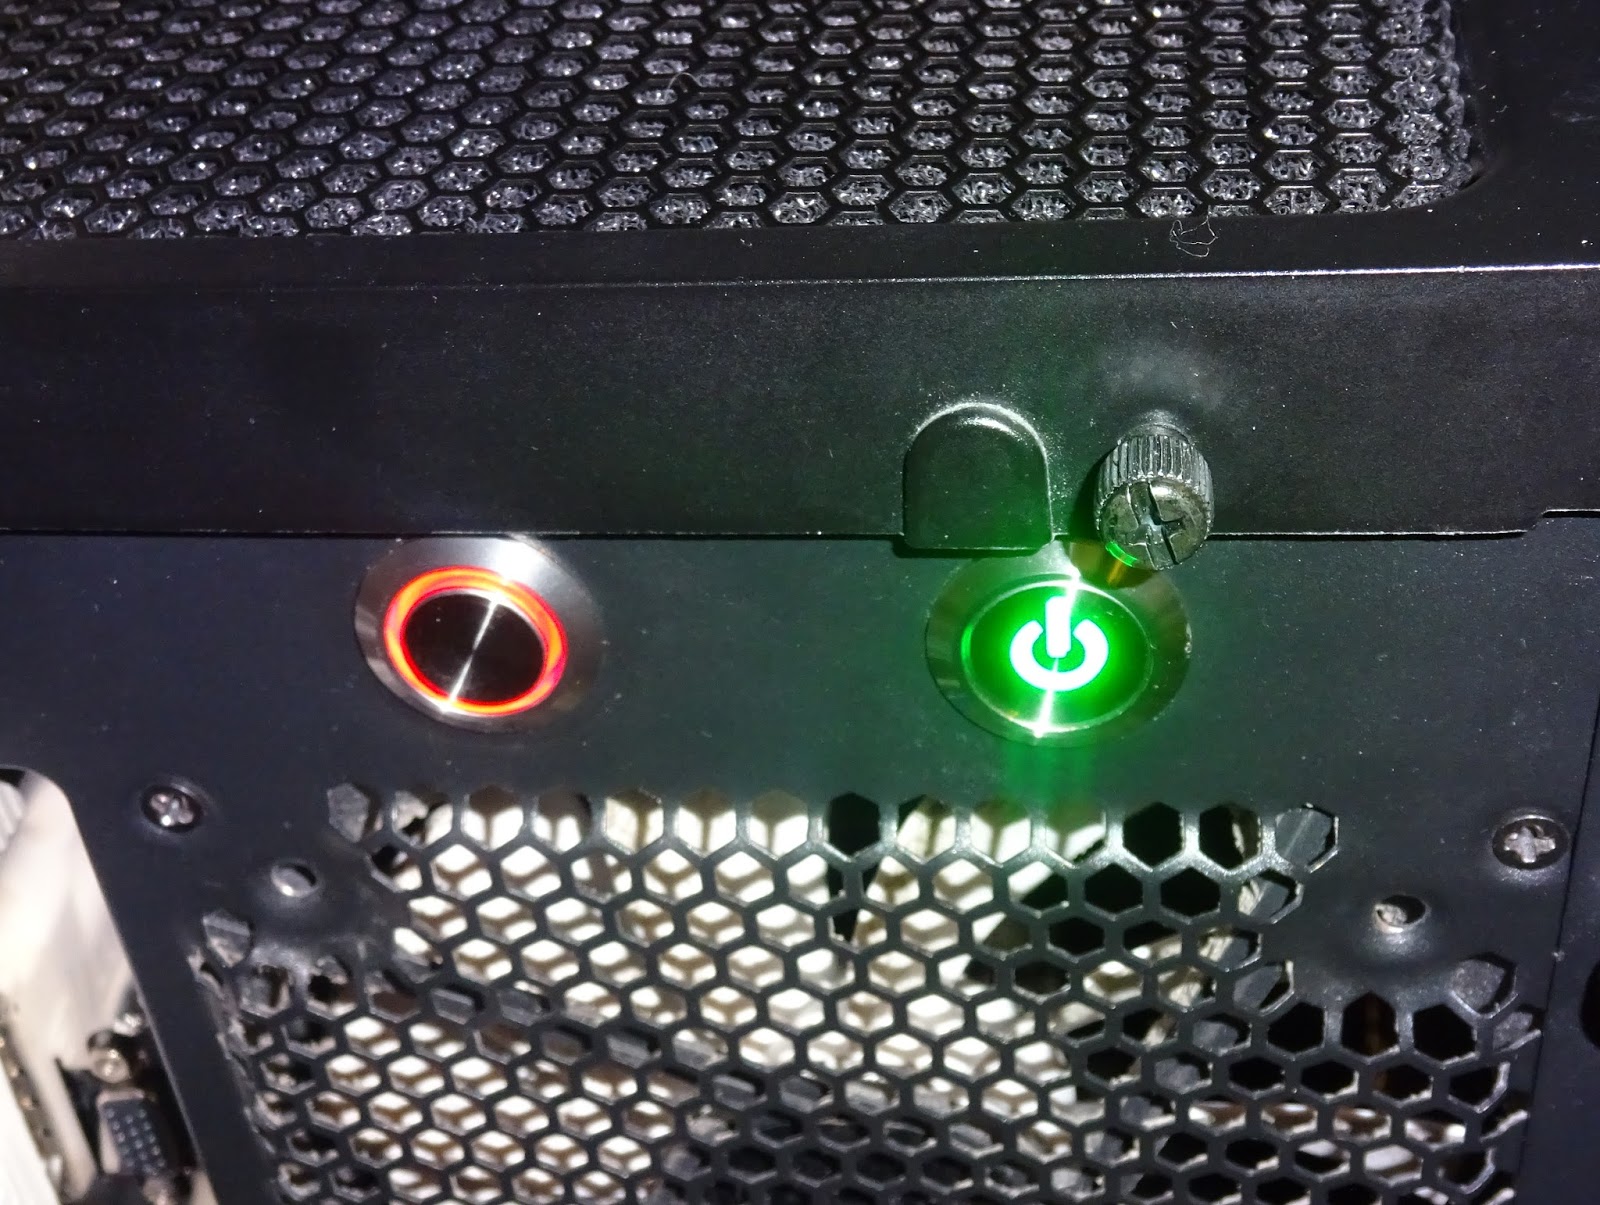
The power and reset switches and the power and hard drive LEDs are trickier. Then I noticed there were two 3/4 inch holes on the back designed for watercooling pipes. I have no plans to fit an external raditator, but I could use them to fit some switches.

After some searching I found some nice 19mm mounting hole 'vandal resistant' switches which were illuminated. I chose one with a green LED illuminated power logo and one with an illuminated red circle.

I couldn't get the exact ones I wanted, so these are designed for 24V operation of the LEDs, and the power button is latching. To get around that, I opened them up. Inside I found a 1K resistor in line with the LED.

I removed that and reattached the LED across the two connections so it could be driven direct from the PC motherboard as intended.

The latch mechanism was removed from the power switch, which turned it into a momentary push switch which is what I needed.

These were wired up with standard PC front panel colours. Two pin connectors for everything but the power LED which has two single pins (to cope with 2 pin or 3 pin motherboard headers).

Those fit nicely in the hole and will provide the new front panel for the PC.

Obviously, I need to keep the wiring inside neat.

The wires are passed through and run down the back plate.

These come out just next to the motherboard front panel connector block. I had fitted one of those Asus easy connect blocks, which may have been from a previous motherboard, but it makes these things easier to plug in right.

The extra USB ports just about fill the back panel. Four of them are from a PCI card, these are the ones I use for testing USB devices, worse comes to worse, they kill the PCI card, rather than taking out motherboard USB ports.

I put the USB 3 ports in a separate vertically aligned slot, which makes them easy to access for memory sticks etc. Time to put it into place on the corner of the office desk.

The LEDs are working nicely, as are the switches. I suspect this will be one of those things where I will feel a little smug each morning when I turn the PC on via the new switches. It is always nice when you do something useful that you use every day to make your life easier.
That's all wired up, I have better view of the power and activity LEDs, and clear access to all the cabling when I need it, and it's out of the way in the corner so I now have more floor space where it used to be.

Nothing for it now, I'm going to have to get some proper work done.
Update
I've been running the PC like this for a few months now and it is doing it's job nicely. The only issue I have is that since moving the PC onto the desk, I have noticed the noise of the fans more than before. It's pretty quiet, but not entirely silent. The CPU fan was fairly quiet, I tried various fan profiles, but the real issue turned out to be the power supply fan.

This Corsair HX850 was left over from the original i7 system which was rather more power hungry. The current i5 system only uses a few hundred watts at most.

I have replaced with with a Corsair RM550x. This is still more power than the installed system needs, but a key point is it will only switch on it's fan when the load is over 225W, so most of the time it runs in silent passive mode.

Since I was redoing the cabling, I took the opportunity to commit to the reserve layout, and get rid of the optical drives and bundle up the front panel cabling where they used to be. The resulting was a lot less cabling.

I also removed the case fans (which weren't connected anyway) and swapped the CPU cooler for a larger quiet one (an Arctic Cooling Freezer 7 Pro).
The case is now very empty. And very quiet.
2022 Update
This PC is still running pretty much as shown here. All that has changed is I added two extra sticks of RAM and an NVMe drive in a PCIe slot.