Tuesday 11 April 2017

Minstrel ZX80 Clone and the ZXpand

This is an old post, preserved for reference.
The products and services mentioned within are no longer available.

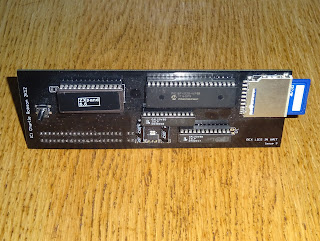
This is the ZXpand. A great addon for a ZX81 which allows you to easily load files from an SD card.
It also has 32K of RAM, the option to add a joystick and (on some boards) an AY3 sound module (as used in the 128K Spectrums). A few people have asked if this will work with the Minstrel ZX80 clone. Well, it should do.
Originally the ZXpand required some modifications to work with the Sinclair ZX80. You needed to modify the ROM enable line to work like the ZX81 does, and wire it to the pin on the edge connector (which is not connected on a ZX80). I had already done that as part of the Minstrel design.
The second change was to use the ZX81 style 8K BASIC ROM. Again that was already available on the Minstrel. So, I plugged it in and tried it out.
Nothing. black screen. I went back to a real ZX81 and the ZXpand was still working fine. The Minstrel was also still working fine. I tested that again with some RAM expansions.
Those were working fine, although pointless as the board already has 16K RAM which the RAM pack disables and replaces with it's own RAM, but that is working, and you can remove the RAM chip from the Minstrel.
Looking through various pages on the internet from 2011 when the ZXpand was released showed some alternative firmware was written. There is also mention in the user manual about a ZX80 jumper. I don't know if my board is an earlier or later version, but there is no jumper as far as I can see.
Meanwhile, I was making some minor modifications to the Minstrel PCB, getting ready to send off the design for the V2.4 boards. I thought it would be useful to just double check the edge connector pinout.
Well, what can I say. Looks like I made a mistake with the edge connector. Starting from the left, it should be D7, RAMCS, D0, D1, D2, D6, D5 etc. Don't know why Sinclair didn't put these in a sensible order, maybe to make routing the original ZX80 PCB easier. Checking my edge connector, I had wired D7, RAMCS, D1, D0, D2, D6, D5. Ooops, D0 and D1 are reversed.
A quick mod to the board, triple check with as various schematics and a ZX81 board and it now seems to be in the right order. Will the ZXpand work now?
Success, The first thing I tried was CAT (which replaces COPY on the Z key). That just gave a white screen. Pressing a key brought up the first page, pressing break brought up the last. I think it may be using SLOW mode here and not returning. Like a ZX80, the Minstrel does not (currently) support NMI slow mode, so remains in FAST mode until you press break. A minor issue that may have been resolved with the ZX80 mode jumper or alternate firmware?
Let's trying loading something, ZX80 Invaders I think.
Great, that works. Now something a bit more taxing.
No problems there either, and it is very fast at loading. So far everything that can run on the 8K BASIC ROM on the ZX80 seems to be working. I don't think this is an option for the 4K ROM version, but there isn't much software available for that anyway.
So the answer is yes, the Minstrel ZX80 clone works with the ZXpand, but owners of V2.3 and earlier Minstrel boards will need to make a minor modification. V2.4 boards currently shipping have this fixed.
I think due to the address decoding, the RAM in the ZXpand has to be mapped as a block from 16K-48K, which is the default. The modification to swap D0 and D1 on the edge connector it is probably easiest done on the back of the board, cutting the tracks at convenient points and wiring the vias to pins on the RAM socket.
You may be asking 'Ah!, but what about the RAM pack, Dave. How did the RAM pack work, Dave?'. Well, the external RAM just reads back whatever gets written to it, do having D0 and D1 transposed made no difference. Would have been the same with the lower address lines, swap any of those around and it would still have worked.

Minstrels boards, kits and fully assembled units can be bought from my Tindie Store.

2022 Update: At the time of writing, there are still a few Minstrel 2 (ZX80) and Minstrel 3 (ZX81) kits available from  The Future Was 8 bit but those are the Final Edition kits, there are unlikely to be any more.

Saturday 1 April 2017

DivMMC Programmer

This is an old post, preserved for reference.
The products and services mentioned within are no longer available.

Since it's Arduino day, here's a recent project where the Arduino came in very useful.
I posted that picture on twitter and had many suggestions as to what it could be, including:

  • Arcade button controller of some sort?
  • Electric shock russian roulette version of the popular Simon memory game
  • Some sort of video mux 
  • CBM serial port network?
  • For testing cables?
  • Quiz buzzer system?
  • Bespoke Track and Field controller?
  • Three-player controller for Flappy Bird!
  • RGB pattern generator?
  • MIDI? Is it a MIDI thing?

And several people who had presumably been watching the IT Crowd, suggested that it was 'The Internet'. Well, no, as much as I would like to announce that this is 'The Internet - Mark 2", where you can safely type google into google without destroying the universe, it is not.
With the labels on, it may make more sense. This is a programmer and tester.
And that is what it programs and tests, the new DivMMC Future from The Future Was 8 Bit. With lots of orders for this coming it, programming each one individually takes a long time, so this will automate this process and program 4 units in parallel. Not directly, but via a number of remote controlled ZX Spectrums.
The Spectrums are connected via the 4 cables on the bottom. The cable on the side controls an ATX power supply to power the Spectrums and monitors.
That worked out very nicely, the 5V standby supply powers the programmer, and power to the main 5V and 12V can be controlled by the Arduino to turn them on or off. The Spectrums are powered by 5V and 12V from the accessory power connectors (normally used for disk drives etc.). These adapter plug into the 3 pin connector where the 7805 regulator would have connected and feed both 5V and 12V into the board.
The programmer needed to automate the process of powering on the units, loading the programming software, programming the units and then power cycling them and testing them out. The power control was already sorted. Next was loading the programming software. This is a one off project, so I went for an Arduino as a base for the project to get something up and running quickly without a custom PCB or too much handwired prototyping.
I did think about loading the .tap or .tzx file from SD card and getting the Arduino to generate the appropriate tones, but I went for a simpler option and used a Sparkfun MP3 player shield to play an MP3 into the tape port of the Spectrum.
The Spectrums we were using for this were Grey 128K +2 units, which have a built in cassette drive, which includes some signal processing, and feeds the Spectrum with a TTL level signal. I built a simple transistor buffer to generate a TTL level signal from the MP3 player output.
The signal goes through some RC filtering inside the Spectrum, so to avoid any interaction between multiple inputs in parallel, I buffered this signal via a gate in a 74LC04 inverter and then inverted it again via one inverter gate per output.
The system is controller via three large, friendly, illuminated arcade buttons on the top, all wired up to headers on the middle board. These light up to indicate which mode it is in. The software is a state machine which progresses through the steps required for 'Program' and 'Test. The blue and green buttons light up to show the current mode, and turn off when complete. The red buttons always shows if the power status, and pressing it turns the power on or off in any mode.
At the bottom of the board stack is the Arduino. I tried various different boards here. The one on the left is an Atmel ATmega328PB Xplained Mini. This has 'Ardunio compatible' headers on the board, and some extra pads where I planned to attach the cables for the buttons and the connectors.
I was hoping it would be possible to flash this with an Arduino compatible boot loader, but didn't get that working. Instead I use Arduino to build the code, and then programmed the board with the hex file via Atmel Studo. Unfortunately, I couldn't get that to work with the Sparkfun MP3 shield, I think due to an issue with the SPI bus.
I looked around an dug out an old 'Arduino compatible' Lenoardo clone. That also had extra pads for headers. That also didn't work - the SPI pins are in different locations on the Leonardo. Finally, I went back to the Arduino UNO I had been using for development, since that was working.
So we have power and audio, the next was controlling the Spectrum. To do that, I had 4 spare outputs from the Arduino, wired in parallel and fed to each Spectrum. Each one of these would attach to a gate of a 4066 quad analogue switch which would be wired into the keyboard matrix to mimic pressing a key. This is designed to be reversible, so the 4066 is only tacked onto the chip below to steal 0V and 5V. The rest is just pushed into the membrane connectors.
I wired up 4 control lines in case the requirements changed. There needed to be the enter key to start the tape loader (easier on the +2 than J symbol shift+P symbol shift+P on a 48K), space to start the programmer, then arrow keys to navigate the DivMMC menu to load a test program.
During the testing, I found I could narrow this down to enter and 6. 6 was both the down arrow for navigation, and 'any key' to start the programmer.
I'll add some photos of the programmer in use and the 4 Spectrums, once they have been assembled in their new home.

UPDATE

The 4 Spectrum boards have been repaired and assembled and the programmer is now running 4 way.

2022 Update: The production version of the DivMMC future is now available from  The Future Was 8 bit