Showing posts with label Cartridge. Show all posts

Sunday, 2 July 2023

Converting more multipart games for the VIC20 - Cataclysm, Battleground and City Crusher

Following on from last weeks introduction, here are some more multi-part games investigated and converted into cartridge games that can run directly from the VIC20 Penultimate +2 Cartridge.

Cataclysm

This looks a nice simple one, two files in a TAP image. Sort of a reverse Blitz game, this time you have to shoot down the bombers that are attacking your city.

The first part is BASIC, and prints up instructions.

This one does need a bit of explanation, so I will leave these in.
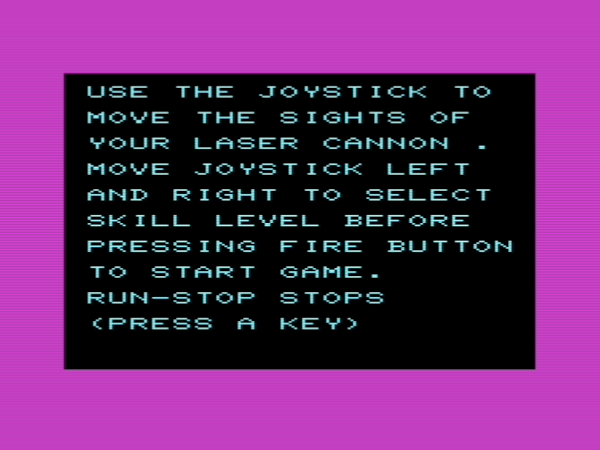
When the third page is displayed, it starts to load the actual game.

It does this by poking some code into RAM at 02A1, and then running it.

In a similar way to Galaxia last week, this sets up a file load which loads the second part into RAM at 1000 (not the usual 1001), and then it jumps to 1700 to start the game.

I edited the BASIC program to remove the file load code and replaced it with a repeat of the "PRESS A KEY" code, and then added a SYS call to jump back to the cartridge loader code to copy and run the game code.

So, for once, that did turn out to be a simple one. Let's hope my luck continues.....


City Crusher

Another one of many Blitz style games that TFW8b seems to like. This looked quite a simple one, two BASIC files in a D64 image, designed for the unexpanded VIC20.

The first is mostly DATA statements and some FOR loops that READ the DATA and POKE in into RAM in the font and colour RAM area. The second is the game itself.

I started off with the simple approach used in Mars Landing, copy the first BASIC program into RAM and run it. The end of the program needs to be changed from LOADing part 2 to doing a SYS call back into the ROM to copy the second program over where the first had been and then running that.

That worked, but parsing the DATA statements and programming the RAM took over 5 seconds, sitting on a blank screen. Not ideal. I could put a "Loading..." type screen up, but I decided it would be better to just replace the first part with some assembler which does the same job.

I fired up the Vice emulator and mounted the D64 image (but didn't auto start it).

xvic -memory none -8 "City Crusher.D64"

I then loaded the BASIC program and found the last two lines, the ones which fed the LOAD instruction for the second part into the keyboard buffer. I deleted those lines and ran the program.

5 seconds later, it had loaded up the RAM and returned to the READY prompt.

Into the Vice monitor, and I saved the RAM to disk. For simplicity, I dumped the whole 64K space.

save "after first.bin" 0 0000 FFFF

0 says write to the current folder, and 0000-FFFF is the address range to save.

The file is in the standard format, so the first two bytes contain the load address, and should be removed to give the pure 64K block of data.

Looking through the BASIC code, it writes to several locations.

POKE56,28

This lowers the end of RAM from 1E00 to 1C00, to free that area for graphics

FORZ=7168TO7679:READX:POKEZ,X:NEXT

This fills a block from 1C00 to 1DFF with graphics data.

FORZ=673TO751:READX:POKEZ,X:NEXT

This puts some code from 2A1 to 2EF

FORZ=319TO414:READX:POKEZ,X:NEXT

This puts some code from 13F to 19E

FORZ=0TO73:READX,Y:POKE37888+Z,X:POKE38144+Z,Y:NEXT

This preloads the colour RAM from 9400 to 9449 and 9500 to 9549.

Finally, the code which loads the second part. This first clears the screen and prints the LOAD command.

FORZ=0TO9:POKE631+Z,13:NEXT:POKE198,10

This fills the keyboard buffer with the return character, and sets the count of characters in the buffer to 10. These will be processed after the program has finished. The screen is already setup with the LOAD command, so that will be executed and part 2 loaded.

In order to make this into a cartridge, I needed to replicate all that, but with fast assembly language routines. I extracted the appropriate sections from the memory dump, and modified the cartridge loader to copy each of those into the appropriate sections of RAM.

Finally, it copies the second part into RAM, relinks BASIC and runs the game.

That all happens in the blink of an eye, much faster than the BASIC loader.

My initial cartridge ROM was 8K, but by shuffling things around I was able to get that down to 4K. There are now quite a lot of 4K cartridge ROMs and PRG files into the Penulitimate +2 Cartridge, squeezing even more content into the ROM.

Battleground

Battleground is another interesting one.

This is a two part loader. The first is just 105 bytes, but it has an unusually load address. Rather than the standard 1001 for an unexpanded VIC, it is loaded to address 02A1. This is mostly unused memory (reserved for program indirects), apart from the last 10 bytes which overwrite some BASIC vectors from 0300 to 0309.

The values are overwritten with the standard values, all apart from two bytes which change the BASIC warm start from C483 to 02A1. So when loading is finished, the BASIC ROM code reads the values at 0302/0303 and jumps to that address. That is normally C483, which prints up the normal READY prompt, but changing these values means it will now call the code at 02A1 instead.

That code writes a lot of values to RAM. The first thing it disables the RUN/STOP key (causing it to lock up), then it resets the BASIC warm start to the normal value.

Next it writes some keys values into the keyboard buffer - L O A D then RETURN. Then R, SHIFT+U (which is a shortcut for RUN) and RETURN again. It sets the number of characters in the buffer to 9 so these will be recognised and processed later.

Then it sets the background and border to white, and the text colour to red.

Next it changes the address of the SAVE routine, so it will not be possible to save the game.

Finally, it jumps to E378 which is part of the initialisation routine. This clears the screen and prints the *** CBM BASIC V2 *** messages and the RAM count, and the READY prompt, all now in red.

The VIC20 KERNAL now checks the keyboard buffer and pulls out LOAD + RETURN and starts to load the actual game (saved with no name).

When loaded, BASIC prints up the READY prompt again and checks the keyboard buffer. This still contains RUN + RETURN, which then runs the game. (OK, it's actually R + shift U).

All of that to stop you being able to SAVE a copy of the game.

However, all you have to do is wind the tape on a bit, so it bypasses the first program, then LOAD the game as normal, and you can then SAVE it? You then have a normal PRG file that I can add directly the the Penultimate + 2 Cartridge, 

Seems a lot of work which must have required a lot of scouring the VIC20 Programmers Reference Guide, and it makes it quite neat I suppose to have it auto start, but I wonder if the "copy protection" would have stopped anyone?


Advertisements

Penultimate +2 Cartridge

The Penultimate +2 Cartridge with these and a host of other games is available to order from The Future Was 8 bit, shipping starting this week.

More info in a previous post:

http://blog.tynemouthsoftware.co.uk/2023/06/penultimate-plus-2-cartridge.html


Patreon

You can support me via Patreon, and get access to advance previews of posts like this and behind the scenes updates. These are often in more detail than I can fit in here. This also includes access to my Patreon only Discord server for even more regular updates.

https://www.patreon.com/tynemouthsoftware

Sunday, 25 June 2023

Converting a multipart game for the VIC20 - Galaxia

During the process of selecting games to add to the new Penultimate +2 cartridge, we have come across a lot of games that load in multiple parts.

These are games where a program loads from tape (or disk), and then goes on to load one or more additional parts. This was quite common in the day due to the memory limitations of the VIC20.

The first part would display a title screen or some instructions or define some graphics characters (or various combinations of the above). Once those have been displayed, the game itself could then be loaded, overwriting all of the previous data and leaving as much room as possible for the game.

Multipart games need to be converted to cartridge images, and that often needs a custom approach for each one due to the ingenuity (or craftiness) of the original designers.

Over on my Patreon, I have written quite a few posts about some of the different techniques found during converting mulitpart tape games for the VIC20. This is one of the later posts, but seems a good place to start as it covers one of the easier conversions in more detail.

Today's game conversion is Galaxia, I wonder if you can work out what sort of game it is based on the cunningly disguised name?

Step one is to check out the source, here a D64 disk image. I load it on Vice, in this case with the following command line

xvic -memory none "Galaxia (1983)(Romik).d64" 

This means start the VIC20 emulator, set the memory to unexpanded and auto-load the Galaxia disk image. Note this is "none" and not 0. xvic -memory 0 sets the VIC20 to have RAM in block 0, the 3K expansion. The number of times I have typed memory 0 by mistake these last few months......

This is to check the source file works. To check if the game is any good, and to check it isn't just the same game with a different name (looking at you, Jeff Minter).

In some cases, the tap or d64 files will contain only a single PRG file, this is not going to be one of those, but that's fine. If it was a single PRG, that would probably be the version that had been archived.

The title screen loads up, press fire and you are into the game, a sort of pillar-boxed version of Galaxians. (did you guess right?)

No time for playing games now, but nice that it is wishing me luck with the conversion.

This all seemed to happen in one go, so is it just a single file then?

There is a common trick of using one program to display a title, maybe some instructions, and sometimes pre-load graphics, and then to load a second part which will overwrite the first, it's job now having been done. This is to cope with the lack of memory in the unexpanded VIC20.

The first of these is very small, so presumably a loader, and the second would be the game itself.

It is always worth loading these individually to see what they are.

In the simplest case, the first will be a title screen and maybe instructions, and the second will the just the game itself, and often if the gameplay is obvious enough, you can ignore the loader and just use the second part, the game itself.

Here, loading the first part, it shows just a SYS command, so it is assembly language program.

Incidentally, in case anyone isn't familiar with it, I used a trick to load the file. The spacing of the directory listing is such that you can cursor up and overwrite the start with the line with LOAD, and add ,8,1 after then name and overwrite the PRG with spaces, then press enter to load the file.

That is sometimes useful if the name is long or difficult to retype due to unusual characters.

Loading the program is fast as there is not much too it. Listing it shows a single line

10 SYS 4112

Normally what happens here is there is a large machine code program directly following the one line BASIC program in memory, all loaded in a single go.

To view what is loaded, I use the monitor in the Vice emulator, and the command

m 1000

To display the memory from 1000 (4096 in decimal) onwards.

There is something that looks like code there, so I use the command

d 1010

To disassemble the code from address 1010 (4112 in decimal) onwards. This is the last one I will mention in decimal, just because it comes from the SYS(4112) command, which is in decimal and stored as the characters '4', '1', '1' and '2' in the file. The rest of the time, assume everything is in hexadecimal.

That is all the code that runs from there. Interrupts are disabled, then 20 bytes are copies from 1020 to 0140. 1020 is immediately after this code, and 0140 is in the processor stack, but in an area not required for the moment.

The tape buffer from 033C-03FB is also a common place to hide code so that it won't get overwritten by the second part loading (unless you are loading from tape, obviously....).

Once the code is copied, the last line jumps to 0140 and runs the code from there.

In vice, I set a breakpoint on address 0140 with the break command.

break 0140

Once that was set, x was used to exit back to BASIC and RUN the program.

Once it had copied the code to 0140, it did the jump and them the monitor kicked in and I was able to disassemble the code at 0140 with the command 

d 0140

This code uses three kernal ROM calls to load a file. The first is to FFBA, SETLFS. This sets the three zero page parameters based on the values in registers A, X and Y, which are loaded before the call.

  • A, LA = 8, logical device (i.e. the channel in the open command)
  • X, FA = 8, device ID = 8, hard coded to the usual default drive, but not always. (trap for young players, this won't work from drive 9)
  • Y, SA = FF, secondary address = FF (tested for 0 or not 0, but normally it is set to 1 rather than FF, but it doesn't really matter)

The second call is to FFBD, setnam. This sets the namename for the load command based on registers A, X and Y. A contains the length of the filename, and X and Y are pointers to the filename

  • A, FNLEN = 8, 8 character filename
  • X, FNADDR (LSB) = 3A
  • Y, FNADDR (MSB) = 10

Together this sets the filename to be 8 characters from address 103A, which is at the end of the area of program memory.

That can be checked with another M command in Vice M 103A

m 103A

The 8 characters are ZZGALAXI, the name of the second file

The final command is FFD5, LOADSP. This loads RAM using the parameters previously set, from device ID 8, with filename ZZGALAXI. Here only register A is used. X and Y hold the load address, which is ignored when SA above is not 0, and the load address from the file is used instead.

  • A, VERCK = 0, 0 means load, anything else means verify.
  • X, MEMUSS (LSB)
  • Y, MEMUSS (MSB)

The final line of code is a jump to 1A26, presumably the initialisation function somewhere in the code.

So, all in all, that does the equivalent of LOAD "ZZGALAXI",8,1 then jumps into the code to launch the game.

The file is 0E00 bytes long, so exactly fills the available space between 1000 and 1E00 where the screen starts. Things must have been so tight that there was not enough space for the usual 10 SYS xyz command at the start.

Normally with these conversions there is a bit more to do in replicating what the first parts of the loaders do. In this case it is just copying a block of code into RAM and running it.

I have created various loader cartridges over the years, and I just pick something similar and adapt it. The cartridge code need to call various initialisation functions from the kernal to setup the VIC and IO chips and initialise the memory etc. 

Looking at the VIC20 KERNAL, pretty much the first thing it does is check for a cartridge.

Unfortunately, for some reason it does this with JSR, rather than just having those few lines of code directly in place.

This wastes a few cycles and a few bytes unnecessarily, but more importantly, it means you need working RAM in the first 1K in order to boot a cartridge, which is a shame for things like Dead Test as nothing can run on a system with bad RAM in the first 1K. (JSR pushes a return address onto the stack at 01FF, and RTS pops that back off to go back there. If the RAM is faulty, the address popped off could be anything).

The cartridge borrows the initialisation code that runs when a cartridge is not present.

Next is a simple block copy routine to copy the code into the appropriate location in RAM.

Normally BASIC is also setup and the newly loaded code relinked and then run as if the user had typed run. However, here, that is not necessary as it just need a jump into the copied code as the original loader did.

I will cover that in more detail in a future post on a game that needs it.

The loader and the block of code together are less than 4K, which is ideal as this now fits into a 4K slot in the Penultimate+2 ROM.

That loads and plays nicely. Although, sadly only in PAL. On an NTSC VIC, the screen is positioned off to the side with no adjustment as far as I can see (some games use arrow keys or joystick to reposition the screen).

I will look at a possible NTSC conversion in future.


Advertisements

Penultimate +2 Cartridge

The Penultimate +2 Cartridge with the Galaxia and a host of other games is available to pre-order from The Future Was 8 bit:

More info in a previous post:

http://blog.tynemouthsoftware.co.uk/2023/06/penultimate-plus-2-cartridge.html


Patreon

You can support me via Patreon, and get access to advance previews of posts like this and behind the scenes updates. These are often in more detail than I can fit in here. This also includes access to my Patreon only Discord server for even more regular updates.

https://www.patreon.com/tynemouthsoftware

Saturday, 23 July 2022

New VIC20 Cartridge PCBs

A new VIC20 Cartridge PCB is now available from TFW8b.com. 


The new design came out of two separate points in a conversation that took place before ordering more of the existing boards.


We currently have one PCB which can be either an 8K or a 16K ROM cartridge for the VIC20, and a second PCB which can only be a 32K ROM cartridge.


The request from TFW8b was "could you do a combined 8K+16K+32K board"? I guess so, but there are already too many jumpers on the 8K/16K board, and to switch to 32K mode would need an extra couple of jumpers at least.

The second point raised is these are half size board, only big enough to pass the screw hole and the two supports.


This is not unusual as most of the Commodore game cartridges were that size.


Comment was also made that these were sometimes a little loose, and not as well anchored as the Penultimate Cartridge PCBs, which fill the whole case.


The second point was "Could I make these cartridges full size as well?"

Well I could, but there would be a whole load of space left. 

I did consider putting a whole load of jumpers up there to do a combined board, but then I had a silly idea.

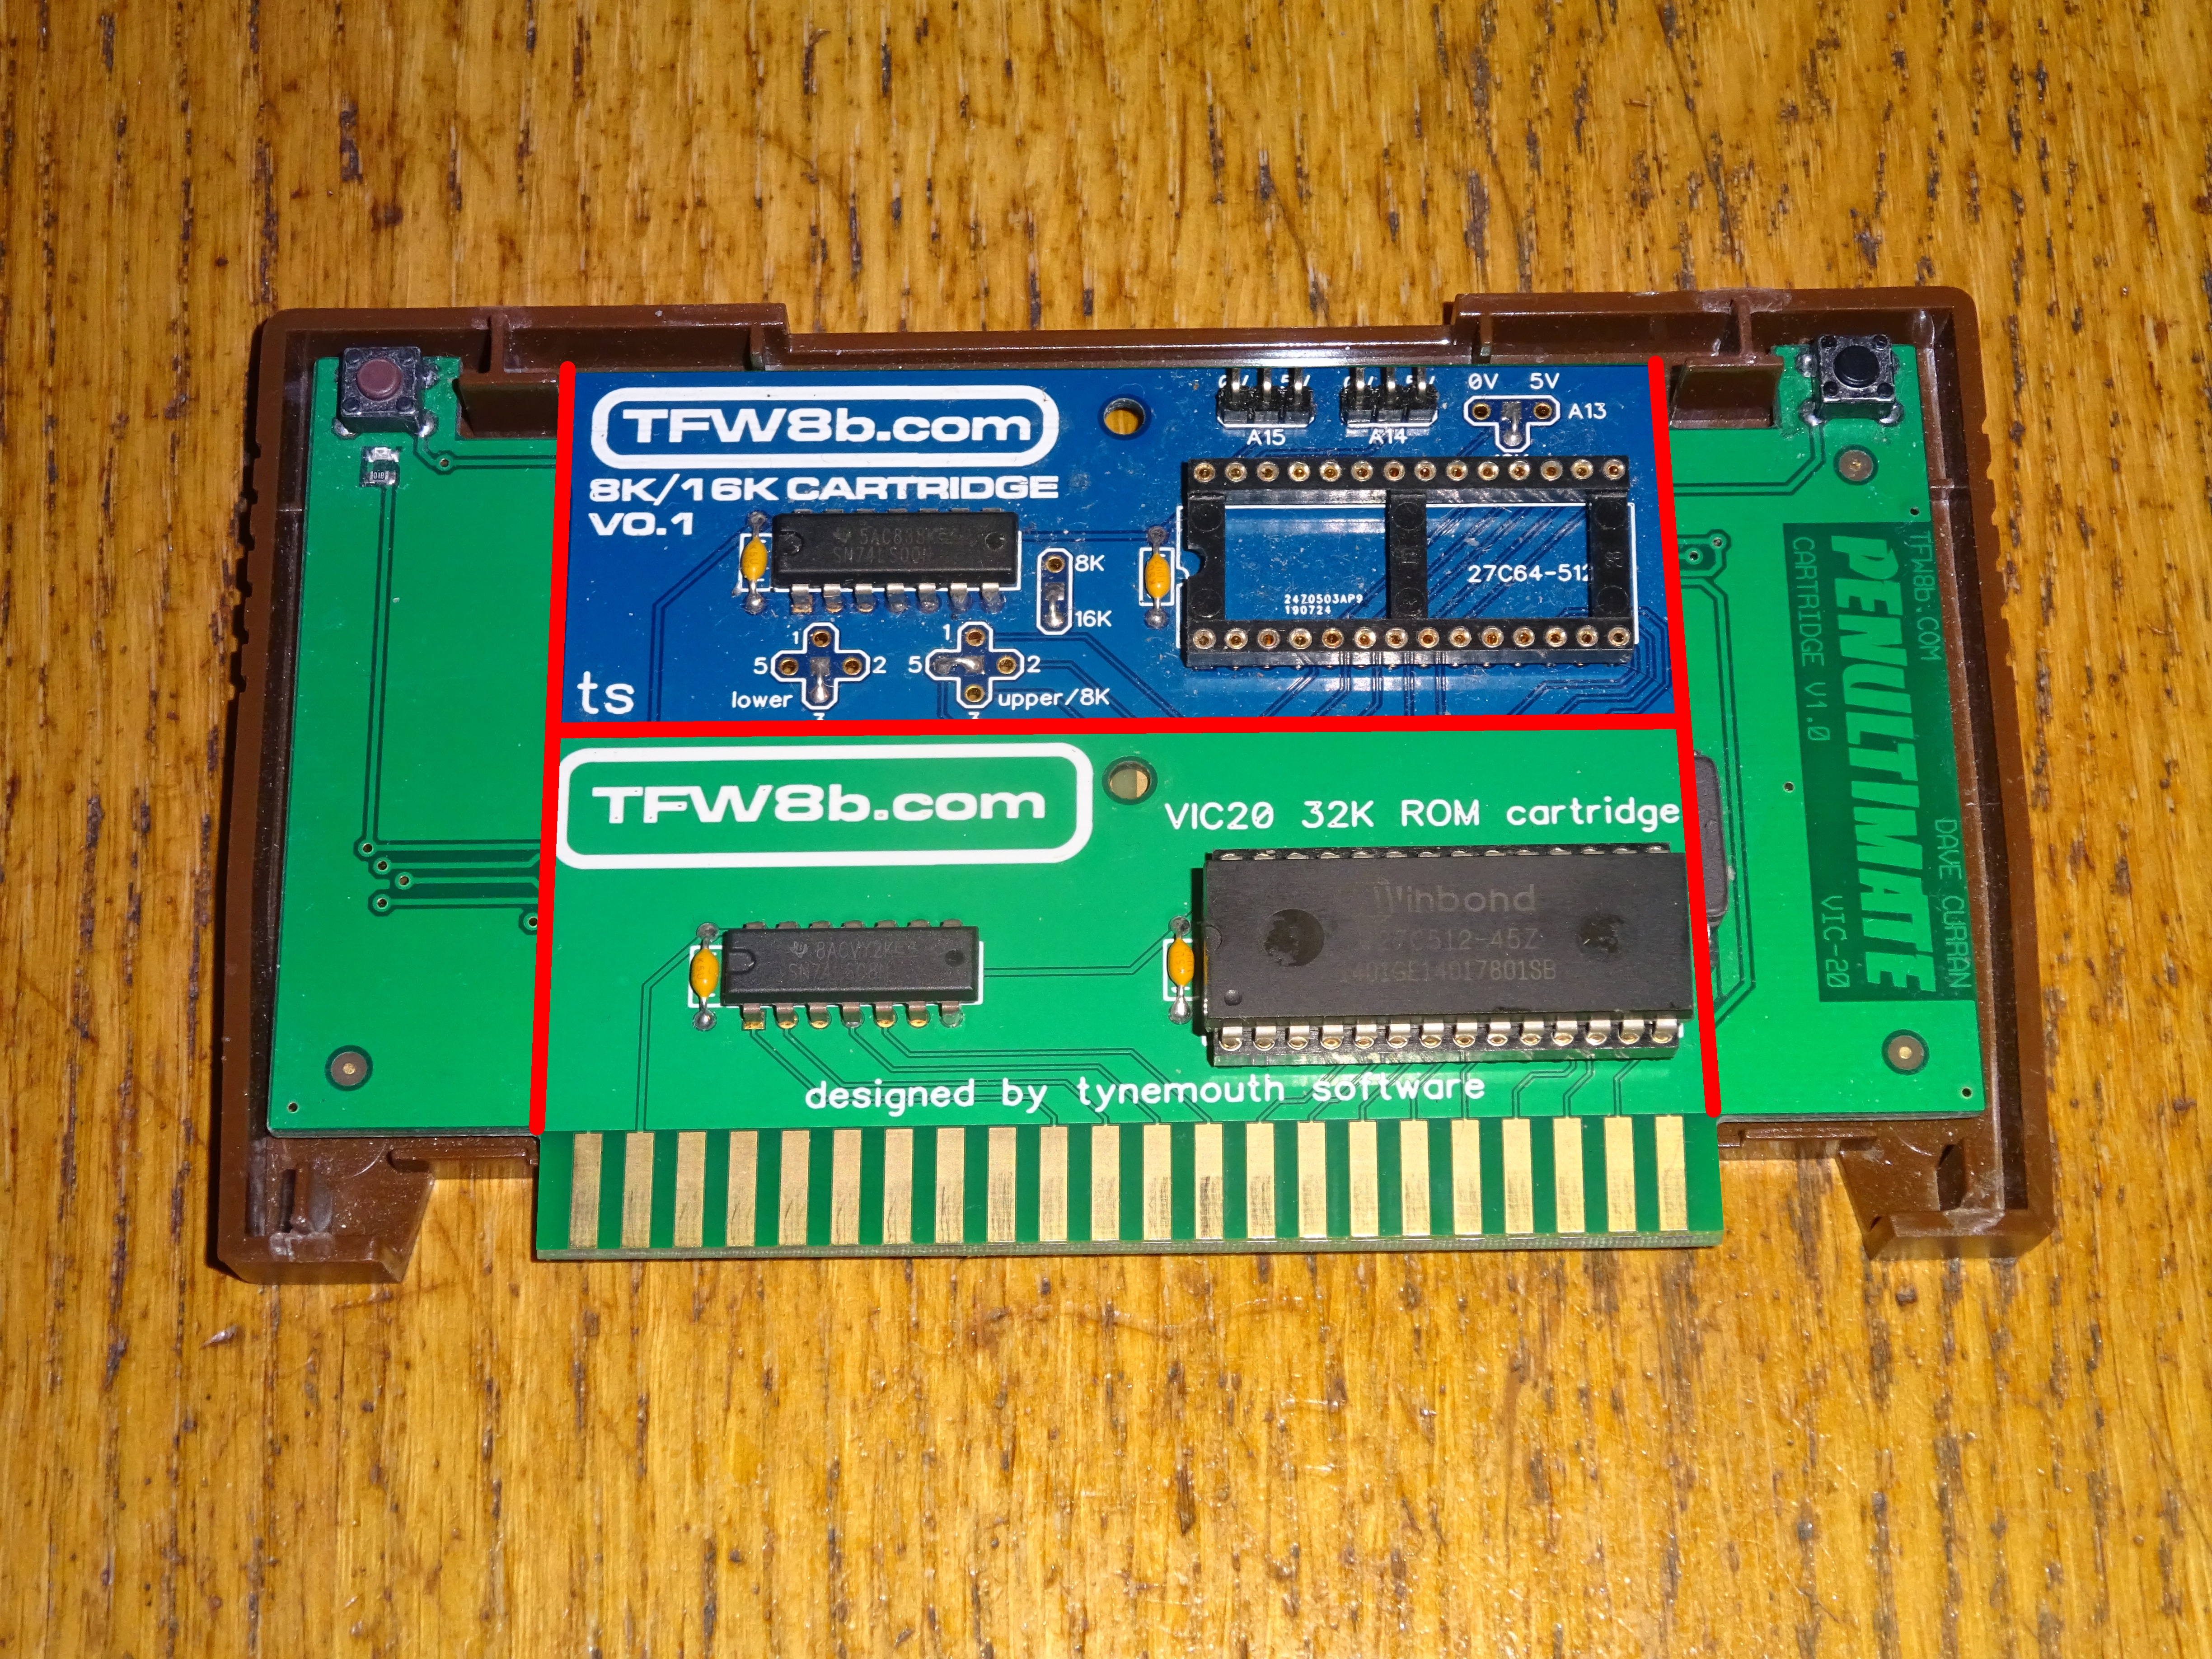
Why not put both cartridges on the same board?

That should fit within the outline of the Penultimate cartridge, with some space at the side.

There seemed to be enough space for both boards, wired in parallel to the edge connector, so I had a go.


You wouldn't fit the chip for both types on the same board, just one set.

For an 8K or 16K cartridge, you would use to the top half of the board and ignore the 32K section.


For a 32K cartridge, you would use to the bottom half of the board and ignore the 8K / 16K section.


That was a full size board (as requested) and could do 8K, 16K or 32K (as requested), but rather than having to set lots of jumpers to switch between the cartridge types, you just fit the chips in different places.

I routed all the traces, and then moved a few things around a bit. I remember there was a central reinforcing bar in the lid of the case, but I had forgotten there was a similar thing along the top, exactly where I had placed the top ROM chip.

Plan B was to rotate the ROM chips 90 degrees and place them at the sides of the board.


I was also rather pleased with the way the traces were laid out. 


And there you have it, the new cartridge PCB. 

ROM chips and ROM blocks

The VIC20's address space is split into 8 8K blocks. Blocks 1,2,3 and 5 are reserved for the cartridge slot, and these cartridge PCBs can place ROMs in any of these blocks. When looking at ROM files, you may see things like 5 or blk5, or A0 or A000 in the filename to determine where the file goes. You sometimes find ROMs as .prg files which are 8K + 2 bytes (8194 bytes), and the extra two bytes are at the start and indicate the address (A000 for example). To use these, first remove those two extra bytes to reduce the file size to exactly 8K (8192 bytes).

Address range
Block
Use
0000-1FFF
0
5K RAM
2000-3FFF
1
8K ROM Block 1
4000-5FFF
2
8K ROM Block 2
6000-7FFF
3
8K ROM Block 3
8000-9FFF
4
Video and I/O
A000-BFFF
5
8K ROM Block 5
C000-DFFF
6
8K BASIC ROM
E000-FFFF
7
8K KERNAL ROM

ROM chips from 27C64 through to 27C512 can be used, as long as the ROM chip is at least as large as the ROM image. If the ROM chip is larger than the image (e.g. 8K ROM in 27C256 EPROM), then it should be placed at the top of the ROM chip (e.g. 0000-5FFF unused, 6000-7FFF 8K ROM image). Note 28C64B can be used, but 28C256 is not suitable as it's A14 pin is in the wrong place.

There is a list of addresses on the back of the PCB, so you can't lose it.

Construction

Construction should be fairly straightforward. There is space to use sockets if you wish, or you can solder the chips direct to the board if you are confident they are programmed correctly. If you fit a chip, you should fit the corresponding 100nF decoupling capacitor, either an axial ceramic through hole capacitor, or there are pads on the back of the PCB to fit a 1206 ceramic surface mount capacitor.

As it says on the board, fit parts only on the 8K/16K side OR the 32K side, do not fit both.

8K Cartridge


To make an 8K cartridge, use the left hand ROM socket and fit the 8K jumper in place of the left hand 74LS08 logic chip. The lower bank jumper is set to 8K mode (there is no lower bank), and the upper bank can be 2, 3 or 5. It is almost always 5, as if a cartridge ROM is detected in block 5, it will automatically start on power on. 

The 8K ROM image should be burned to the EPROM at the following addresses.

Address range
27C512
27C256
27C128
27C64
0000-0FFF
-
-
-
8K Block 2/3/5
1000-1FFF
-
-
-
2000-2FFF
-
-
8K Block 2/3/5
3000-3FFF
-
-
4000-4FFF
-
-
5000-5FFF
-
-
6000-6FFF
-
8K Block 2/3/5
7000-7FFF
-
8000-8FFF
-
9000-9FFF
-
A000-AFFF
-
B000-BFFF
-
C000-CFFF
-
D000-DFFF
-
E000-EFFF
8K Block 2/3/5
F000-FFFF

4K Cartridge

It is also possible to build a 4K cartridge, using the 8K settings above. The 4K ROM image should be at the start of the 8K bank, and the 8K bank should be at the top of the ROM as above.

Address range
27C512
27C256
27C128
27C64
0000-0FFF
-
-
-
4K Block 2/3/5
1000-1FFF
-
-
-
-
2000-2FFF
-
-
4K Block 2/3/5
3000-3FFF
-
-
-
4000-4FFF
-
-
5000-5FFF
-
-
6000-6FFF
-
4K Block 2/3/5
7000-7FFF
-
-
8000-8FFF
-
9000-9FFF
-
A000-AFFF
-
B000-BFFF
-
C000-CFFF
-
D000-DFFF
-
E000-EFFF
4K Block 2/3/5
F000-FFFF
-


16K Cartridge


To make a 16K cartridge, use the left hand ROM chip and the left hand 74LS08 logic chip. The 16K is split into two 8K blocks. The lower bank can be block 1, 2 or 3. The upper bank can be block 2, 3 or 5. Select the upper and lower bank with the jumpers. Most use 1+5 or 3+5 (except Scott Adams text adventures which use 1+2)

The 16K ROM image should be at the top of the ROM chip

Address range
27C512
27C256
27C128
0000-0FFF
-
-
8K Block 1/2/3
1000-1FFF
-
-
2000-2FFF
-
-
8K Block 2/3/5
3000-3FFF
-
-
4000-4FFF
-
8K Block 1/2/3
5000-5FFF
-
6000-6FFF
-
8K Block 2/3/5
7000-7FFF
-
8000-8FFF
-
9000-9FFF
-
A000-AFFF
-
B000-BFFF
-
C000-CFFF
8K Block 1/2/3
D000-DFFF
E000-EFFF
8K Block 2/3/5
F000-FFFF


32K Cartridge

To make a 32K ROM cartridge, use the right hand 74LS08 and right hand ROM chip. There are no jumpers to set, the ROM is always mapped as blocks 1+2+3+5.

The 32K ROM image should be at the top of the ROM chip. 

Address range
27C512
27C256
0000-0FFF
-
8K Block 1
1000-1FFF
-
2000-2FFF
-
8K Block 2
3000-3FFF
-
4000-4FFF
-
8K Block 3
5000-5FFF
-
6000-6FFF
-
8K Block 5
7000-7FFF
-
8000-8FFF
8K Block 1
9000-9FFF
A000-AFFF
8K Block 2
B000-BFFF
C000-CFFF
8K Block 3
D000-DFFF
E000-EFFF
8K Block 5
F000-FFFF


Cases


These fit snugly in the TFW8b VIC20 cartridge cases. There are two places where a reset button could be installed if you need one and have a hole in the case.


I think they have turned out rather nicely.


Advertisements

The new cartridge PCBs and cartridge cases are available from The Future Was 8 bit:

Patreon

You can support me via Patreon, and get access to advance previews of projects and behind the scenes updates. This now also includes access to my new Patreon only Discord server for even more regular updates.

https://www.patreon.com/tynemouthsoftware