Showing posts with label Joystick. Show all posts

Sunday, 27 September 2026

Tynemouth 9 Way D Joystick for Minstrel 4th and RC2014 V2.0

This is the new Multi-Standard 9 way D joystick interface for the Minstrel 4th and RC2014.

It might not be immediately obvious what has changed from the previous V1.0 board.

We could play spot the difference, but the main changes are the address jumpers have gone and there are now DIP switches with more options.

The jumpers were sort of pointless, as most people would have set them to ID $01 to make the joystick port compatible with the Boldfield joystick for the Jupiter Ace.

You could have set it to a non-standard ID if you wanted, but that would have only worked with suitably modified software.

You could have set it to ID 31 and pretended to be a Kempston interface, but that would not have worked as the joystick signal bits are arranged in a different order on the Kempston interface.

That is where the V2.0 board comes in.

It now has two DIP switches to select one of three interfaces it can emulate.

  • Boldfield Joystick is a vintage standard for the Jupiter Ace
  • Kempston Joystick is a vintage standards for the ZX81 and ZX Spectrum
  • ZXpand which is relatively modern, and supported by some newer ZX81 games

To support those three addresses and three different arrangements of bits, there is now a GAL where there the 74HC240 was on the original.

This now handles part of the address decoding, the multiplexing of the joystick signals to the appropriate data bits, and acts as an 8-bit latch, like the 74HC240. Inverting the signals as required for Boldfield and Kempston, but not ZXpand.

This should be useful for the Minstrel 4th and it's ability to run Jupiter Ace and ZX81 software, so there is a good chance that one or other of those formats will be supported.

Games like Paul Farrow's ZX81 Kong can support the Kempston interface. Press X to select the controls (because C is mapped to the X key, because Jupiter Ace).

Colin Dooley's Valkyr for the Jupiter Ace support the Boldfield interface.

David Stephenson's Zevious Seven for the ZX81 deserves special mention as it supports all three!

It asks the user to press fire, and is scanning the keyboard and the three interface options.

Whichever one it detects you pressing fire on, it uses for the game. Neat. That is how I normally recommend doing control selection if you need to.

You might have noticed I haven't included a game with just ZXpand support.

That is because I couldn't find one.

Well, I found a couple, including Paul Farrow's Against The Elements, that support the ZXpand joystick, but use high resolution graphics that do not work on ZX81 BASIC for Minstrel 4th.

I found another, ZXagon, which lists ZXpand support, but that didn't seem to be working. I think it was using the mode which only works with the ZXpand ROM that has a patched INKEY$ function, rather than reading the port directly.

There does not seem to have been much uptake unfortunately, which is why I added Kempston support to the Minstrel ZXpand.

If anyone knows of a game I have missed that supports the ZXpand IO port joystick, but doesn't need high resolution graphics, let me know.

Programming / Testing

If you want to use this in your own games, then just read from the appropriate port and check the appropriate bits.

Plug in the card to the RC2014 slot on the side of the Minstrel 4th, or a backplane if you are using one and add a suitable Atari or Commodore style 9 way D joystick (not Atari 5200, Spectrum +2, Sega or things like that). No mice, paddles, light pens, serial adapters or Elks.

Assembler

In assembler, the minimum you need is:

IN A,(31)

I use 31 in these examples for the Kempston interface, replace with 1 for Boldfield or 7 for ZXpand as appropriate. 

Note the ZXpand interface itself requires a two stage operation, request a joystick read, then read the port. The request part is not required with this board, and will be ignored. The joystick data will always be read afresh from the port.

Forth

Forth has a built-in IN word that reads the port in the same way.

A simple test word is as follows:

: JOY
BEGIN
     CR 31 IN . 0 
UNTIL
 ;

This will continually read values and scroll down the screen.

Being Forth, that scrolls by very fast.

ZX81 BASIC

ZX81 BASIC does not have an IN word, that wasn't added until the ZX Spectrum.

To get around that needs a little bit of assembler.

XOR A
LD B,A
IN A,(31)
LD C,A
RET

To get that into the ZX81 requires a bit of poking around with a REM statement.

You start with a REM statement on line 1 with 6 characters. Then poke the values of the assembled Z80 code into the addresses where those characters are stored.

1 REM ......
10 POKE 16514,175
20 POKE 16515,71
30 POKE 16516,219
40 POKE 16517,31
50 POKE 16518,79
60 POKE 16519,201

The 31 on line 40 is the address of the port, so you can change that to 1 or 7 as required.

One you run that, the REM statement changes.

You can then delete lines 10-60.


A shortcut is to start with the REM statement containing the following:

  • Inverse J (shift + 9, J, shift + 9)
  • . (any character, will be replaced by POKE 16515,71)
  • <= (shift + R, note not < then =, <= is a single character)
  • 3 (which is 31 for the Kempston interface or any character to replace with POKE 16517,1 or 16517,7)
  • . (any character, will be replaced by POKE 16518,79)
  • TAN (shift + newline, shift + E. note a single character, not T A N)

You can enter the POKE for the missing characters in immediate mode if you like.

PRINT USR 16514 will call this new code.

You can then make a simple test program. I put the SCROLL first otherwise it prints the first line then starts scrolling from the middle of the screen.

ZX81 BASIC shows off an interesting feature here.

The zeroes scroll past quite fast, but as soon as you move the joystick and the numbers appear, things slow down.

I think this is due to the storage of numbers as floating point in ZX81 BASIC, so it has to convert to a 5 bytes floating point representation, then parse that back to display it. There is a shortcut for 0 which skips the conversion steps.

Here I press down on the Boldfield interface setting, which shows up as 2. Then I change to down and left and it shows 8+2, 10. Then I finally get the answer by pressing fire which adds 32.

The Boldfield and ZXpand versions of the test program only differ by the character after the <=, a top left quarter graphic for Boldfield, and a bottom right inverse quarter graphic for the ZXpand. (the author adds a note at this time stating he would welcome suggestions for better names for the battenburg characters)

With the ZXpand, the rest state is 255, and when you move that bit goes low, so you end up with values like 247 for fire, 255-8.

That's Great, Dave, Where Can I Get One?

The Tynemouth 9 way D Joystick V2.0 for Minstrel 4th and RC2014 is available as a kit or assembled from my Tindie store. As with everything else on there, if you are outside of the UK, please contact me directly as international shipping calculations don't work on Tindie so I have to get prices on a case by case basis.

It is also available as an add-on option when ordering a Minstrel 4th kit.


All items are still available, and I can ship worldwide.

Including the Minstrel 2 (ZX80), 3 (ZX81) and Minstrel 4th (Jupiter Ace / ZX80 / ZX81 / Lambda 8300 / RC2014,) with built in keyboards

All versions are available in kit form, or pre-built, and optionally the new Minstrel ZXpand II SD card and joystick interface for the 2 and 3 or the Software Serial and 9 way D Joystick for the 4th.

International shipping is a bit complicated at the moment, so if you want to order from outside the UK, please contact me using the contact link at the top of this page.

See here for more information:

Sorry to have to do this, and I know this is going to affect sales, but please understand it is the only option I have right now.


Patreon

If you enjoy posts like this, you can support me via Patreon, and get access to advance previews of blog posts, and exclusive posts.

You also get progress updates on new projects and other behind the scenes updates, as well as access to my Patreon only Discord server for even more regular updates, and to discuss your own projects.

Sunday, 29 March 2026

Joystick Emulators

This is a joystick.

It might not look like one, but it is electrically very similar.

It has four white buttons, for the four joystick directions, three fire buttons, and a power LED.

You plug this into something which is expecting a standard Commodore / Atari 9 way D joystick, and can operate it using the buttons.

This is useful for testing, and also for things like operating the menu on the divMMC.

Especially when you don't have a keyboard to hand.

Or when you are testing and don't want a long cable pulling on delicate bodge wires.

Pinout

The pins as wired as per a standard Commodore / Atari joystick port. This will not suit an Atari 7800 or the Spectrum +2 side ports or anything else with a non-standard pinout.

  1. Up
  2. Down
  3. Left
  4. Right
  5. Fire 3
  6. Fire 1
  7. 5V
  8. GND
  9. Fire 2

Pins 5 and 9 have various different functions, sometimes one or two extra fire buttons, or analogue paddle inputs etc. Here they are wired to buttons Fire 2 and Fire 3. Fire 1 on pin 6 is the standard single fire button.

The LED is connected to the 5V pin, not all ports provide this (e.g. my PET dual joysticks), and some have 5V and 0V reversed so the LED with not light (some Spectrum Kempston interfaces and the original RC2014 joystick interface).

I couldn't decide which version of the schematic to use, so there you go, have two.

Or three.

Kits

I have listed these on my Tindie store.

This is quite a simple through hole kit, but it can be supplied assembled if you don't fancy it.

I designed these quite a long time ago, so they don't have the rounded corners I talked about in the last post.

Although the reason for the shape is that it was designed to fit into a case, or rather half of a case.

The full case is the one I use on the USB joystick adapters.

Whilst I have some of the cases left, there is an option to include the half case.

(C64C and grubby power supply cable not included)

Adverts

You can find the joystick emulators in my Tindie store, alongside all sort of kits, test gear and upgrades and recreations of the ZX80, ZX81, Jupiter ACE and Commodore PET.


Patreon

You can support me via Patreon, and get access to advance previews of development logs like the ones these posts are based on, and progress on new projects like the Mini PET II and III and Mini VIC and other behind the scenes updates. The new Mini PETs are coming on well, so watch this space. This also includes access to my Patreon only Discord server for even more regular updates.

Sunday, 22 December 2024

Reading the joystick port from VIC20 BASIC

The post I wrote on fixing Autofire in VIC20 Bandits (and Multitron) was originally much longer. Patreon supporters got to see the full version in October, but when I came to post it here on the blog in November, I thought it was too long, so I cut some bits out. I now present the "deleted and extended scenes" from that post.

Let's start with a bit of VIC20 BASIC.

Reading a joystick on a VIC20 from BASIC

To read port A of first 6522 VIA chip in the VIC20, you can use the BASIC command

    PRINT PEEK(37137)

You can write a very simple program to repeatedly print that out

    10 PRINT PEEK(37137)

    20 GOTO 10

If you take a standard VIC20 with nothing attached and do that you will get a value of 126 all the time.

If you have a joystick plugged in, you will still read 126.

If you press fire, the value will change to 94.

If you move up, the value will change to 122.

If you move down, the value will change to 118.

If you move left, the value will change to 110.

If you move right, the value will still read 126.

That's a bit of an unfortunate quirk of the VIC20. For some inexplicable reason, the joystick right input is on a different port, on a different chip, so you have to do

    PRINT PEEK(37152)

Normally that will read 247.

If you move right, the value will still read 247.

But I thought you said....

Yeah, another quirk of the VIC20. That port is normally all outputs, driving the keyboard columns. In order to read it, you have to set it to an input first.

Really? but that's very inconvenient. Yeah, well, I didn't design it.

Instead you need to do something like this

    10 POKE 37154, 127 : PRINT PEEK(37152) : POKE 37154, 255

    20 GOTO 10

That will set the relevant pin to an input, read the value, then set it back to an output so it will not mess up the keyboard scan routine.

Now if you run that it will normally print 247.

If you move right, the value will change to 119.

(although ideally you would not have the PRINT routine there, just read to a value to reduce the time where the pin is not an output)

Given that information, you could write a simple program that reads those ports, and compares against those values.

    IF PEEK(37137) = 94 THEN PRINT "fire!"

However, there are a few problem. If you move up and press fire at the same time, you get a different value, 90, so the test would fail.

A better way is to test the individual bits, so

    IF (32 AND PEEK(37137))=0 THEN PRINT "fire!"

(it is never ideal doing bitwise work in decimal, it is much easier to see in hex or binary, but that's what we're stuck with in BASIC).

10 A = PEEK (37151)

20 POKE 37154,127 : B = PEEK (37152) : POKE 37154,255

30 IF (A AND 4) = 0 THEN PRINT "up"

40 IF (A AND 8) = 0 THEN PRINT "down"

50 IF (A AND 16) = 0 THEN PRINT "left"

60 IF (B AND 128) = 0 THEN PRINT "right"

70 IF (A AND 32) = 0 THEN PRINT "fire"

80 GOTO 10

That seems to work.

But what about the other bits?

There are also some other issues with just comparing values.

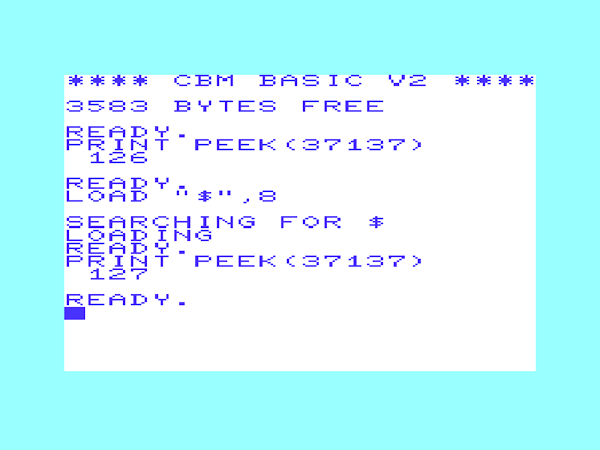
If you have a datasette plugged in, the value of 37137 will still read 126.

If you have left the play key pressed after loading, the value will now read 62.

All your comparisons by value will now be broken, bitwise tests will be fine.

The obviously causes an issue for some games, which have a "PLEASE STOP TAPE" message at the start of the game (rather than changing the tests to cope with that)

Something else that affects the value is the IEC bus.

If you have a IEC drive plugged in, the value of 37137 will still read 126 at power on.

If you have accessed that drive, it will now read 127.

Any developers working on a purely tape based system may not have known that.

There was also this long section that was cut where I worked through what was happening in the game Bandits.

There is one more game on the cartridge which has this autofire issue, but I haven't been able to fix that before. Time to have another go.

Fixing Bandits

I wonder if I can fix Bandits now? That seems to just autofire all the time, it does move correctly, but fire is stuck on.

The issue is the same, although the implementation is a lot more complicated.

   lda $9111

   asl

   asl

   asl

   bcs label_b410

   and #$ef

And it goes on

label_b410

   asl $9120

   ror

   ora #$04

OK, I worked through this to find out what is going on. The ASL is arithmetic shift left. That moves the state of the fire button out into the carry. That gets rid of the IEC ATN and cassette sense in the process, but leave the IEC clock and data in the mix (now moved to bits 3 and 4)

It can test the fire status by checking the carry bit. If it is clear (i.e. if fire button pressed), it clears a different bit with an AND instruction. It clears bit 4, and in future testing, that is the bit it now uses for testing fire. (why it does this I don't know, maybe they just wanted the directions together?)

After that it reads VIA#2 Port B and shifts bit 7 of that into carry. The ROR is rotate right, that rolls the carry (joystick right) into the accumulator.

Finally it ORs this with 04, which forces bit 2 high.

The final upshot of all that is the accumulator now contains joystick right, joystick left, joystick down, joystick up, and the reposition joystick fire. It then saves this and uses it for comparisons.

        C 7 6 5 4 3 2 1 0

Read   x A C F L D U d c

         ASL    A C F L D U d c 0

         ASL    C F L D U d c 0 0

         ASL    F L D U d c 0 0 0

         AND EF F L D U f c 0 0 0   if fire f = 0, otherwise d       

       ASL 9120 R L D U f c 0 0 0

         ROR    0 R L D U f c 0 0

         ORA 04 0 R L D U f 1 0 0

On a normal VIC20 with no IEC device attached, that works fine. It assumes that the value of bit 4 part way through shuffling is going to be a 1. It then sets it to 0 if fire is pressed. However, if the value of that pin is already 0, then it will think fire is pressed when it isn't.

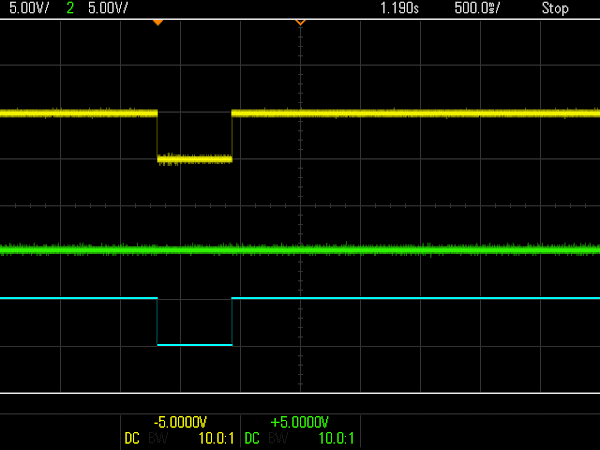
That bit happens to contain the value read from the IEC data pin, the top trace in yellow as before.

That is how it looks if you have no IEC device connected. The dips are when the chip is in reset. The drive pins become inputs, and the inputs to the 7406 buffers float high and assert the signals. After reset, the pins are set as outputs. Data and ATN are released, but clock stays asserted as that is the default state for the VIC20. Basically it is putting it's towel down on the deckchair and saying "if anyone is going to talk around here, it is going to be me".

If there is an IEC device present, it sees that and responds appropriately by asserting data to say it is ready to receive.

Bandits seems to interpret that as fire being pressed.

The autofire can score quite well just sitting there, but ideally you would have control.

As with the other games you can avoid this by not having an IEC device attached.

The odd thing with Bandits, is you can also"fix" the problem by pressing the drive reset button. That's unusual, I don't think any of the other games were helped by this.

I tried all sorts of things, including resetting the drive via software before launching the game, but always when it started it would it would end up with the data line held low.

I finally got to the bottom of why, and it wasn't part of the code above that reads the port, it was earlier on in the initialisation........

The story continues in the main post where I then went on to fix the problems in Multitron and Bandits.


Advertisements

The patched versions of Bandits and Multitron are included in the new Penultimate +3 version which also has a built in SD2IEC drive.


Minstrel 2 and 3 kits and PET repair parts are available from my Tindie store..

I will slowly be moving things over there from my SellMyRetro store, so if there is anything that you want, let me know and I'll add it.


Patreon

You can support me via Patreon, and get access to advance previews of posts like this and behind the scenes updates. This also includes access to my Patreon only Discord server for even more regular updates.