Showing posts with label Tapes. Show all posts

Sunday, 27 July 2025

3D Monster Maze Repair

When I am testing a Minstrel 2 or 3, or the new Minstrel 4th ZX80 and ZX81 modes, I try to load from various sources.

Sometimes ZXpand, sometimes a tzxduino based player, sometimes tape, sometimes vintage tapes.

When testing the Minstrel 4th ZX81 mode, I tried various of my original 1980s tapes as well as ones I have picked up since.

It's good to see a game loading from tape like that, the same tape I used to load the game 40+ years ago.

I used to quite like "Perilous Swamp". I managed to rescue the princess.

But was beaten at the last step. (this is all written in BASIC, and I remember I spent a lot of time in my youth looking through games like this to see how they worked and making my own versions. Must resist looking to see what the algorithm for "fight" is, presumably relative strength plus some random element?)

One tape I can't load like that is unfortunately 3D Monster Maze.

I do have _a_ 3D Monster Maze tape, but it's not _my_ 3D Monster Maze tape, that is in a safe place.

Somewhere.

The problem is that one does not load. It always seems to fail at the same point, it fails to load one way or another on a ZX81. It is easier to see that with the load countdown on the Minstrel 4th.

When I modified ZX81 BASIC for the Minstrel 4th, I ended up writing a whole new LOAD routine, which seem to perform better than the original one with some tapes, but not in this case.

I tried sampling the waveform, and you can see it dips to almost nothing at one point.

I wondered if I could re-record it.

It felt wrong, but I guess that tape is never going to load as it was.

Those who did not grow up with tapes may not recognise the significance of the tape, there are holes in to the of the case that stop it being recorded on. Add tape and then you can. Normally sellotape would be used, I have used brown parcel tape to make it more obvious.

It is an old tape, so I blanked it several times first to make sure it was a good starting point.

OK, no going back now.

I used my "master tape creator", which is a Spectrum +2 with a tzxduino "temporarily" installed in it (since 2017).

Time to write the tape.

I played it back, but unfortunately, it also dipped in the same place.

OK, plan B. Next level of wrongness.

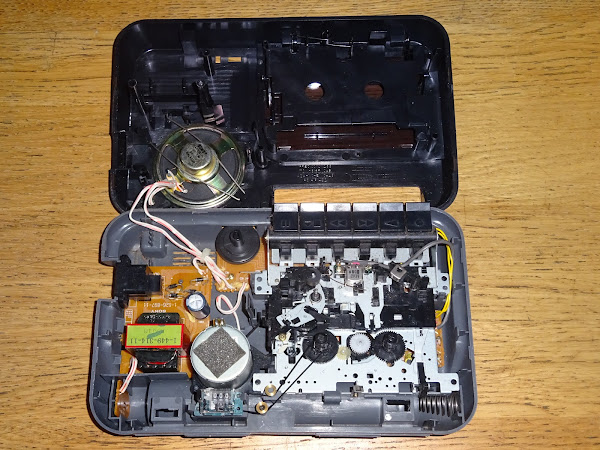
I decided to replace the tape. The case was unfortunately sealed on both side, no screws, so I had to splice in a new section between the two sections of red leader tape.

I took a "new" C15 tape and recorded 3D Monster Maze onto it.

This one looks like the label was applied by the same person that used to put the labels onto Dragon 32s.

The sampled version also looked a lot more consistent.

I tried loading it, and it loaded fine.

(I had made sure to get the right version with the J.K.Greye copyright, and not the reissue by New Generation Software)

OK, there we go, I cut the tape out of the original 3D Monster Maze tape and then spliced in the new C15 tape.

I used my incredibly expensive professionally calibrated tape winding device....

And wound the new tape carefully into the shell. Once it had all gone it, I cut the end from the C15 spool and spliced it to the other end of the 3DMM tape.

OK, time to give it a go.

Great, it's nice to be able to load 3D Monster Maze from tape again.

I was concentrating on getting the tape to lay flat for the photos and ended up with the splicing tape on the wrong side, I will need to go back and redo that, but it works fine.


Adverts

The Minstrel 2, 3 and 4th is all included in the 15% off everything in my Tindie store for the whole of July.

Be quick, there is not long left to take advantage of that offer.


Patreon

You can support me via Patreon, and get access to advance previews of things going on behind the scenes updates, currently working on the Mini VIC and Mini PET II. This also includes access to my Patreon only Discord server for even more regular updates.

Sunday, 27 October 2024

Sony TCM-818 Cassette Recorder Part 2 - Battery Upgrade

In the last post I look at the Sony TCM-818, a great cassette recorders for use with 1980s computers.

One of the things I didn't like was the battery power option, since I would rather not use C cells, and using AA rechargeables in adapters is not ideal.

Battery Upgrade

My plan is to take a bit of a tatty TCM-818, I picked up recently and make it my daily driver work horse. I could use power it from the mains, but I would rather keep it battery, so I plan to replace the four C cells with something better.

The C cell voltage is between 1.2V and 1.5V, so 4.8V-6.0V for a set of four.

Checking the schematic, the main IC is an LA4162.

(I was slightly disappointed to note the erase head on the bottom left there is a magnet rather than being a proper one, but I guess it works fine and I rarely record on these)

There isn't much information on that IC, but it appears to be rated for 3-10V, so this is well in the range.

In a previous post, I harvested some 18650 cells from a laptop battery.

My plan is to use two of these in place of four C cells.

The 18650s are nominally 3.7V, but that can range from about 3.6V to 4.2V depending on the charge level. A pair of those should give me between 7.2V to 8.4V.

That is maybe a little high, so I was thinking of various ways to reduce the voltage a bit. My first thought was a couple of 1N4001 diodes, these have approximately 0.6V drop, to should reduce the nominal 7.4V to 6.2V.

The other option was a 7806 linear voltage regulator. That should fix the voltage at 6.0V, and turn the rest into heat.

Players like these do not have a power switch, they only activate when one of the buttons has been pressed. The regulator would need to be placed after those switches, so it was only be active when the device was in use, and I am sure I could find a bit of metalwork to bolt it to. I wouldn't use one of those switching buck / boost regulators, as they will introduce high frequency noise.

I couldn't find a two inline 18650 holder, so I have used two individual 18650 cell holders, test fitting those it looks good.

Wiring two of those in series is one of the odd occasions where you connect black to red. Still seems wrong.

I left a bit of length to those two wires, and covered the join with a bit of heatshrink.

I was hoping I might be able to make the connections without opening it up, but it didn't look like I could. (if I was one of those people who have made the time to setup a 3D printer properly, I might have designed 3D printed C cell shaped end caps that would have held the cells and made contact at both ends, but I am not, so I didn't)

Disassembly

I looked around and found there was only one screw. None hidden under labels or in the battery compartment.

Other than this one screw, it is held together with a series of clips. To disassemble, you start with the one on the back left of the battery compartment, and work around to the one on the right.

Not ideal, but I have been running a variety of these for decades and I think this is the first time I have actually had to open one up.

It looks like the replacement TCM-919 has screws around the side rather than those clips, so I might have a look for one of those. But I still prefer the styling of these.

Now I had it open, I thought it was worth checking what voltage the mains power supply was putting out.

It is a very simple transformer / bridge rectifier / capacitor circuit.

Measuring that shows it is outputting about 8.4V, which dropped to about 7.6V when playing.

Given that, I think I could just go for the easiest option and wire two 18650s holders directly in place of the four C cells. That would give a similar voltage range to the one it is already getting from the mains power supply.

The positive side of the battery connection is on a PCB on the side, so I soldered the red wire to the back of that.

The negative side is the usual battery spring.

The spring wire continues all the way to the main PCB. So I just soldered onto that at a convenient point. (bottom left)

You can see the LA4162 IC in the centre. No Sony branding on the IC itself? No branding of any kind?

This should give me a nice convenient way of powering one of these drives, and should last for ages. I was going to use hot glue or foam pads, but they seem to fit in place quite nicely, keeping the mods minimal and easily reversible.

Two of those recovered Samsung 18650 will do nicely. They were effectively free, recovered from an old laptop battery.  Ideally you would use ones with the built in protection chips. You should probably add one of those small boards with DW01 protection chips on. I didn't have any to hand, but should probably get some.

Whilst I had the unit apart, I thought I would do the usual maintenance, clean all the grot from the mechanism and add a little white lithium grease to the moving plastic parts.

Belt up

I bought a belt kit a while ago, but have never had a reason to fit it, they have all just worked fine.

I thought since I had this one apart, I would swap them out, see if it made a noticeable difference.

There are three belts, the smallest goes under the flywheel.

The largest goes from the top of that to the motor

There is a third thin belt that drives the tape counter.

With the new belts and 18650 based power supply, I went through the tape speed test again.

3.002 KHz, I'll take that.

That was about half volume. No clipping at the top, 7.5V.

Testing

Let's run this through a few tests, this is ideal to test out the new Minstrel 2 and 3 kits.

I'll start with a Minstrel 3, and 3D Monster Maze.

Carefully following the instructions on the back of the case.

Nice loading bars.

There were several sections where the tape is clearly worn out and the signal dropped to almost nothing. I tried both sides of the tape, but the B side was worse. No 3D Monster Maze for me today unfortunately.

Most of the other things I tried did load.

Paul Farrow's games are good tests as they have a checksum test before launching the game.

As does Psion's Flight Simulator.

Of course, you can use a real ZX81 if you have one of those.

I just had a new Spectrum cassette turn up, so I'll give that a go as well.

The Spectrum has nicer loading screens.

Ooh.. Nasty!

That has all worked out quite nicely. I was pleased to find a better solution to those fiddly C cell adapters.

The TCM-818 was clearly built to a price. I was a little disappointed to find a magnet erase head and the case being held together with clips, but I guess they spent the money on a decent cassette mechanism. Neither but neither of those caused me any problems over the years, these have been solid and reliable cassette recorders, and I hope they will continue to be for many years to come.


Advertisements

As I announced last week, I have reopened my Tindie store and have new batches of Minstrel 2 and 3 kits, for ZX81 case or standalone with keyboard, and ZXpand microSD card interface.

From there I can ship worldwide.

I will slowly be moving things over there from my SellMyRetro store, so if there is anything that you want, let me know and I'll add it.

More info can be found here:

Patreon

You can support me via Patreon, and get access to advance previews of posts like this and behind the scenes updates. These are often in more detail than I can fit in here, and some of these posts contain bits from several Patreon posts. This also includes access to my Patreon only Discord server for even more regular updates.