Friday 24 August 2018

Wellon VP-390 Universal Programmer Repair

This is an old post, preserved for reference.
The products and services mentioned within are no longer available.

Here we have a Wellon VP-390 Universal Programmer. A nice bit of kit for programming EPROM and GAL chips etc. But unfortunately this one is not working properly at the moment. The problem is intermittent (my favourite type of fault).
Sometimes it work fine, other times, it fails to program known good chips, or brings up errors before it starts programming, highlighting which pins it has problems with.
Those unfortunately are not consistent either, usually on the right hand side, but not always the same pins. It seems to happen more when programming ATF16V8B GAL chips, but also sometimes with other things.
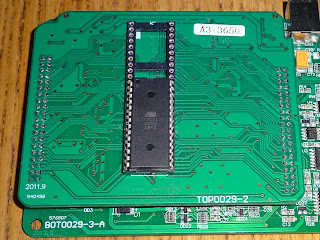
Inside, there is a two board construction, connected together by two rows of pin headers.
The top board contains the ZIF socket, and on the back, a load of 74HC595 shift registers, transistors, diodes and resistor arrays.
These presumably select for each pin if it is a data IO pin, or one of the switched programming voltages. I was starting to think it was one of these that was at fault, that's going to be fun to find.
The base board houses two large chips, an ST ARM microcontroller, and an Xilinx FGPA, and all of the power supply generation components.
Everything on there looks OK, nothing obviously damaged. The only oddity is a small 6 pin chip with the markings ground off. Really? Do people still do that?
At this point I did a lot of poking around and testing, and couldn't find anything wrong. I have updated the firmware, and gone through all the self test options, including a mode in the software which generates a series of voltages to test.
5V was OK, a little low, but acceptable.
12V seems fine.
21V is also a little low, but not a problem.
The ZIF socket on these is actually mounted in a socket, I thought at this point, it would be good to rule that out. Programming with a chip directly in the socket worked. Several times. No problems. Hmm. Is it the ZIF socket?
The socket on there is a 48 pin 'universal' ZIF socket (i.e. it can accept both normal 600mil wide EPROMs and narrow 300mil chips), and I had trouble finding an exact replacement for the Aries socket on there.
These are 3M sockets (well, OK, they are probably knock off 3M clones), the only ones I could find that were 48 pin universal.
The only problem with the 3M sockets (even the real ones) is the pins are much thicker than a normal IC, or the legs on the Aries socket. This means unfortunately they do not fit in the nice turned pin socket on the board.
I have found in the past that those ZIF socket pins can be pushed into the cheaper 'standard' dual wipe type sockets, which I don't normally use as they aren't as nice as the turned pins ones.
As a temporary solution, I installed two less good sockets into the good socket, and the ZIF socket plugged into those.
That worked, but was too tall to fit back in the case, so I ended up desoldering the nice turned pin socket and replacing it with an improvised 48 pin dual wipe socket, made from two cut down 28 pin sockets.
The ZIF socket can then fit into that at a suitable height to fit in the case.
I did some more testing like this, and couldn't get it to fail, it seems it was just a bad ZIF socket.
Back in the case, it looks slightly strange as I am so used to seeing it with the black socket, but I'm sure I'll get used to the blue/green one.
First off, I ran it though all the self tests and voltage tests again, I thought I had a problem as the 21V read as 0V, but I had forgotten the 21V is not present unless you are using an external power supply. With that plugged in, everything passed. Time to program some chips.
OK, lets start with a challenge for a modern programmer, a 2732 4K EPROM which needs a 21V programming voltage.
Success. OK, looking good so far. Now a 27C64, 12.5V programming voltage.
Passed again. Something modern now, 5V programming voltage 28C64B EEPROM.
Yes, no problem there, and these had been one of the things that failed more often. On that subject, I then went through a whole tube of 16V8B GALs with no problems. Now you see why it needed a socket that could accept narrow chips.
OK, this is looking good. I next tried a bigger chip, a 27C160 EPROM, 42 pins. Also fine.
And finally, I needed to check an Amiga kickstart ROM, and it read that fine (set as AT27C400 and turn of insertion detection / device ID check).
So, I think that is it sorted, all down to a bad ZIF socket. I guess it has been used a lot, so has probably worn out, although it has had less use than some of my other programmers. Here it is, now matching the Mini Pro TL866CS which I have had for longer and used more and is still going strong with a similar looking '3M' socket.
I don't know how long the cheap 3M copy ZIF sockets will last, but they were only a few pounds each, and I bought a couple so I can just plug in a new one if there is a problem. I will keep a look out for some genuine 3M or other replacements.

Sunday 19 August 2018

Pimoroni Picade build

This is an old post, preserved for reference.
The products and services mentioned within are no longer available.

Behold the new Picade from Pimoroni (for the record, I am pronouncing that Pie-cade from Pim-moroni, but you can please yourselves).
I've been tempted to build a table top arcade type thing for a long time now, but when I saw this, and it was on an introductory offer, I couldn't resist and ordered it straight away.
I wouldn't normally mention packaging, but this kit is really nicely presented. Each selection of parts is in it's own box, all coloured to match the theme.
There is also a massive poster with the instructions on the back, which is a nice idea, but a bit unwieldy to work with, a smaller booklet or a PDF version would probably have been easier to follow.
The parts are all pre-cut, pre-drilled, pre-painted, and just need bolting together, so it didn't take too long for me and my little assistant here to put it all together. The only issue we had was working out which screws to use for each bit, as they weren't labelled, and we either missed some or they supplied too many.
Pimoroni have rolled their own display board, which bolts neatly onto the back of the display. A nice 8" 1024x768 panel, slightly smaller than their previous Picades, but a higher resolution. And also the proper 4:3 aspect ratio, as it should be.
That is powered via USB with an HDMI input, the panel flat flex fits in the top, and there is a small button board which connects with a second flat flex and is mounted on the back (although I didn't need to use any of the controls on there).
I'm doing my best here to avoid scratching the LCD panel and the perspex screen, or getting fingerprints all over it. The screen, marquee at the top and the control panel have paper inserts with the artwork on, so you could print your own if you wanted to customise your Picade. (templates are available on their github)
The control panel is all setup to just push in the buttons and bolt on the joystick unit. The joystick is microswitched, an all in one units with a single connector to make wiring up easier.
The buttons are the low profile ones, which don't quite have the same feel as a clicky microswitch. They are standard size, so I may end up swapping them out at some point. (see update below)
The buttons are all handled via GPIO to a custom Pi hat, the Picade X HAT, which also contains an audio amplifier and soft power switch control for the Pi. There is no provision for a volume control on the hat, and it is quite loud, so maybe their install script could set the volume to 50% before starting, or add some volume buttons?
The connections are all 0.1 headers apart from the speaker which is a type of connector I hadn't come across before, and didn't get on well with. Apparently you are meant to just push the speaker wires in, but I couldn't get them to stay in place. Not a fan of that, but I can see they were trying to avoid screw terminals or things like that.
I'm also not a fan of the new Pi packaging with just a cardboard box. It feels wrong without an antistatic bag, but that's apparently how they ship them these days. (update: apparently it is ESD cardboard, still feels wrong through). The arrangement for attaching the Pi was a little fiddly (it took three of us!) it would maybe have beeen easier with male-female standoffs for the Pi rather than long screws and spacers.
The Pi isn't included with the kit, so you need to supply your own, and your own microSD card. They recommend RetroPie, as would I, so I downloaded that and set it writing to the SD card whilst we finished the build. You also need a power supply, and one of the official 2.5A power supplies is recommended.
The rest of the wires from the buttons and joystick pushed into the 0.1" headers with no problems as you may be able to see from this terribly arty terrible photograph.
And that was it put together, it took a couple of hours, ably assisted by my Nephew, who quite enjoyed building something more than his usual Lego. Then came the fun part, lets plug it in.
First off, I got nothing on the screen. I wasn't sure if I had switched in on right, as the power LED wasn't very bright (shouldn't be a problem normally I had just picked a very rare day with sunshine). Checking the Pi, the lights were on, but there was nothing on the display. I tried various things at this point. Everything worked separately, just not together. It seemed it needed a bit of help detecting the HDMI screen, so uncommenting 'hdmi_force_hotplug=1' in the config file fixed it. Right, it's booted, time to run the script to install the Pimoroni settings.
Ah. Not good. Segmentation fault? (and it's my turn for a self portrait, the screen is quite reflective on camera, but you don't notice it much when using it). I think what had happened is when I wasn't sure if the power was working I might have turned it off again during the first boot when it resiszes the partition? Anyway, I wrote the card out again, and that worked fine.
Sorry the photos on here are a bit rubbish, I didn't have much of a chance to take them, and I'm not going to get much of a look in now my Nephew has taken the controls.
A couple of suggestions, for future versions. It seems the power to the LCD panel is slightly delayed as it is powered via USB from the Pi, this caused the problem with initial detection. It would maybe be better to add a USB socket (or better, a custom power connector) to the Pi Hat to power the LCD direct from the switched power supply. That would also free up a USB port on the Pi (not that you need them), but would also save power going through the GPIO header into the Pi and back out again.
I also have some issues with the key mappings. The GPIO wired buttons are mapped to the keyboard, as things like space, shift and control keys, and the 4 buttons around the side the escape, enter, two letters (I think they were i and o, where 1 and 5 would have been more useful for MAME). That didn't quite make sense, and I had a few goes at mapping the buttons to avoid the buttons triggering other things in the various emulators on Retro Pie (i.e. the NES one kept going into a fast forward high speed mode). I think I might be installing one of my USB game controllers in there instead, so I can map the keys without conflicting. (see update below)
Oh the whole, a very nicely presented kit, that can be built in an afternoon with minimal tools (and optionally, the assistance of a small child), and I am sure will keep us all entertained for some time. You can build it as intended, as I have done here, but there is a lot of opportunity for customisation (there's even seen one with a full RC2014 system fitted into it, but that's another issue). The introductory offer price has finished, but the normal price is still pretty reasonable, under £200 all in.
https://shop.pimoroni.com/products/picade

Update:

I have now fitted standard arcade buttons with microswitches, and designed a USB Aracde Controller and fitted it to my Picade.
That maps the buttons and the joystick as a USB game controller and that is working much better with RetroPie.
Available from my Tindie store, with or without an extension that adds 64 more individual key inputs mapped as most of the keys on the keyboard, for those really massive arcade controller builds.