Sunday, 4 August 2024

Minstrel Input Monitor (includes requirements creep)

This is one of those cases of requirements creep, or "oh, that's a good idea, let's add that".

It started with a suggestion from my discord that I should make a module for the Minstrel Expansion Bus that clicks when you type on the keyboard, like the ZX Spectrum does and the ZX81 doesn't.

OK, that sounds interesting, I think I can do that.

The basic principle is to detect reads of IO address $FE. That will be reading the onboard 8 bit input port. This includes 5 bits for the keyboard columns, the cassette ear input and the PAL/NTSC switch.

When that is read, the results are placed on the databus, so in theory if I decode the address and then read the databus, I should be able to read what is placed on there by the buffer.

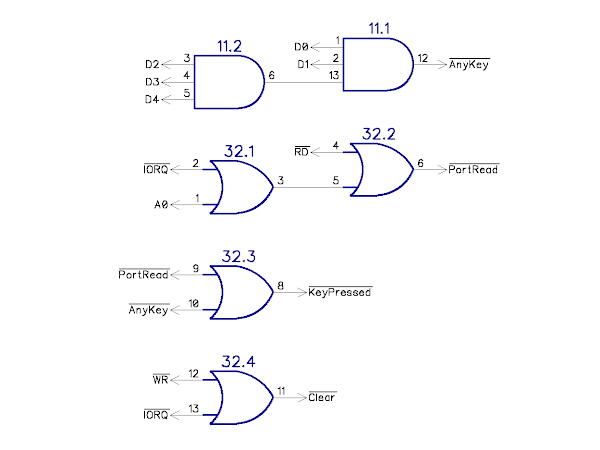
A very simple circuit at first attempt. Minimal decoding (since that is the same employed on the ZX80 / 81 and Minstrel 2 / 3 etc.) to get a "keyboard port is being read" signal. This goes low when the port is being read.

The 5 keyboard columns are pulled up to 5V, and when a key is pressed it is connected via a diode to one of the high address lines. When that row is being scanned, the address line is taken low, and the signal is pulled low via the diode.

I don't care which key is being pressed, so I can just AND them together (using an imaginary 5 input AND gate for illustrative purposes).

That will be high normally, and goes low when any key is pressed. If I were to OR /AnyKey and /PortRead together, I would have a signal which goes low whenever a key is being pressed.

I could just wire that up to a piezo.

Finished, job done. Export gerber files and click order.

Well, no. That pulse will be really short, so will barely register. I need to make the pulse longer.

I did think about using a 74HC123 one shot, or even a 556 dual timer, and maybe I should.

I thought about the options and remembered there is a second signal I could recreate. Following the keyboard scan pulses, there is an IO write, which is used to trigger the next video line to be drawn.

If I use the brief "key pressed" pulse to trigger a flip flop, I can use the matching IO write pulse to clear it. Giving a much longer pulse, approximately 180us to 380us long, depending on which row the key is on. This will repeat every frame, giving a pulse every 20mS, a 50Hz hum which should be OK for a "click".

I used a 74HC74 for that.

I routed out a board, but there is some space left.......

Oh I know, I can add an LED. That is using the Q output of the flip flop, I could use the /Q to drive an LED.

But the 74HC74 is a dual flip flop. Shame to waste the other half ....

Oh I know, can I add an indication of cassette load data? Well, that is bit 7 of the same port, so I already have the signals I need.

To make things easier, I'll redraw the schematic a bit at this point. This is the way I normally work, creating small functional groups. Almost like hardware subroutines. I find it easier to follow like that, rather than have to follow wires around a whole page. 
I used the other half of the flip flop, with the "keyboard port is being read" signal clocking the data from D7 into the flip flop. This is sampled on the rising edge, which should be the same as the Z80 does, so should be good. (I did at one point have the other flip flop clocking in the "any key" data, but that would have been too short a pulse)

I used the same clear on IO write to ensure it gets turned off after the load, and added a second LED.

Another pair of functional blocks, the /Ear and /Key signals go low when there is data or a keypress respectively.

I initially mixed the signals to the piezo with 470Ω resistors.

However, I thought "what if someone doesn't want to listen to it loading, but does want the keyboard clicks", or indeed vice versa.

So I added some jumpers to disconnect each signal.

But that would mean the signal was at half amplitude if both were active, so I decided to change from a analogue mixer to a digital one, since there was a spare AND gate that could be used to give a clean digitally mixed signal.

I rearranged the resistors so there were pullups on the AND gate inputs to act when the jumpers are removed, and updated the board layout.

That is done, right?

Well I am not a fan of using 2 pin jumpers, where you take those jumpers off and leave them hanging on a single pin, or put one away in a safe place, never to be seen again.

So I changed it to a 3 way jumper instead. That also removes two resistors, so is probably neater anyway.

I think that is the final board, although I haven't actually tested the design yet, I may as well just order some and then I can try it out and if necessary make changes and respin the board next time.

As I said before, I was working on this in the "functional blocks" way, and this is the schematic I was creating along the way as I was designing it.

That's my preference, that's the way I prefer to work. It can be tricky sometimes to find where a particular signal is generated, but as things get more complex, I would move things into boxes or onto separate pages.

I have been asked several times for a single page Minstrel or Mini PET schematic, and I have tried, but it is a lot of work, and I don't find the results particularly easy to work with.

I have redrawn this fairly simple circuit "all in one". Do you find that easier to follow?

It is a bit like comparing the multi page schematics of the PET with the huge single page of the BBC Micro. I have spent many many hours with both of those schematics, and I have to say I would chose the Commodore way every time.

The same with the ZX80 schematic, redrawn here by Grant Searle

Back in 2016, I redrew that for the Minstrel 1 (as it wasn't called). I was fairly new to the PCB software, so I used busses. I think I started with the three busses used on the original diagram, but ended up merging them into one big one. Not very easy to follow, but it was really just to get the parts wired up to be able to create a PCB.

When I came to do the Minstrel 2, I decided it was best to redo that. It still follows pretty much the same schematic, but I redrew it in functional blocks. That has now grown to an 8 page schematic with things in separate blocks.

That's just easier for me to follow.

An example page: (the bottom right block is the new stuff).

Any thoughts, which type of schematic do you find easier to follow?


Advertisements

The Minstrel Input Monitor Kits are available from my Tindie store:

Various other bits for the Minstrel Expansion Bus are described here:

My store also contains the full range of Minstrel and Mini PET kits and accessories, best to use the contact me link about, tell me what you want and where you are and I will send a PayPal invoice. Sorry I have to keep saying that. I am working on an alternative.

All the links can be found here:

Patreon

You can support me via Patreon, and get access to advance previews of posts like this and behind the scenes updates. These are often in more detail than I can fit in here, and some of these posts contain bits from several Patreon posts. This also includes access to my Patreon only Discord server for even more regular updates.

Sunday, 28 July 2024

ZX Spectrum "Lo Profile" Keyboard

Some of these blog posts are put together from several Patreon posts, written as I am going along. Sometimes I only end up using bits of those in the posts that end up on here. This is one of those occasions. That was meant to be the main focus of the post, but ended up getting cut out altogether. Well now you can read about it.

When I was writing the post that became "ZX Spectrum future proofing" (http://blog.tynemouthsoftware.co.uk/2023/08/zx-spectrum-issue-2-future-proofing.html), the plan was to feature that as a small part of another post. Just show the voltage regulator and composite mod and get back to the other post, but you know how things go, that one grew into a large post of it's own.

The main feature of the post was meant to be this "Lo-Profile Professional" keyboard I picked up on ebay a couple of years ago that I finally got around to unboxing and trying out.

I had been looking for one of those for a while, as a friend of my Dad's had one of these in the 1980s and I learned BASIC programming on that, so it would be nice to have one of those again.

However this one was listed as "spares or repair", and indeed, is unfortunately an accurate description.

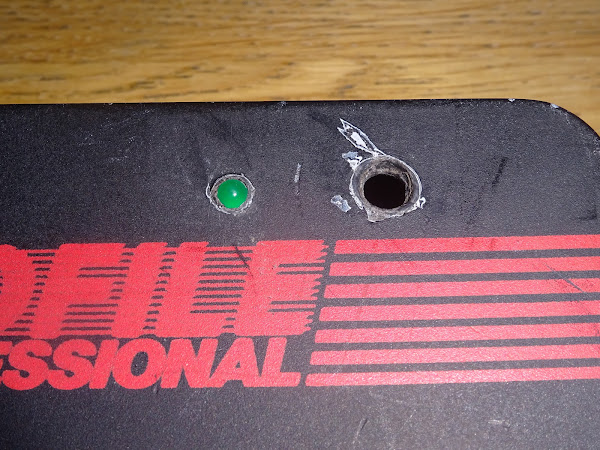
I was aware that there had been some mods made from the pictures in the listing, but I was hoping to be able to cover those, like I did with the Oric Atmos with the big hole in it's case. (http://blog.tynemouthsoftware.co.uk/2022/11/oric-atmos-repair.html)

I had assumed these were from back in the 1980s, but it looks like this might have had more recent work.

I don't have a date for these, but I would guess maybe 5-10 years ago, the website does not seem to be active any more, and the Tindie store where these would have been sold is gone.

It was missing a Spectrum board inside, but I had a ZX Spectrum on the bench needed some work, so I planned to fix up the Spectrum and then test it out in this case.

There is a lot of space in there, I think it would have been intended to fit the power supply inside, and maybe other accessories. (like this one featured in my post on the 80K Spectrum mods - http://blog.tynemouthsoftware.co.uk/2020/03/a-zx-spectrum-with-80k-of-ram.html)

Time to test it out. It is sort of working, but it looks like the keyboard PCB is warped. The key sections screw on and interlock together, and none of them seem to sit properly any more, so don't make good contact.

That is as many keys as I got working. Not sure if I will be able to solve all the mechanical issues to get this going again. (photo taken with the original capacitor composite mod before I redid it with the video buffer board).

Some are missing due to a couple of broken wires on the connectors, others don't sit right and don't register at all. Others had to be removed as if the screws were tightened down, the keys always reads as pressed, so they only work if you partly tighten the screw, which is not really a solution.

I am wondering if I might be able to designed a new keyboard PCB for it?

It's a little strange in that it is single sided, but has overlaid traces on the top to make it dual layered?


Advertisements

I have a full range of Minstrel and Mini PET kits and accessories, if you are interested in any of those, contact me using the link top right of the blog page, and tell me:

  1. What you want
  2. Where you are

and I can send you a PayPal invoice.

Hope to have a better solution soon.

See here for what is available:

Patreon

You can support me via Patreon, and get access to advance previews of posts like this and behind the scenes updates. These are often in more detail than I can fit in here, and some of these posts contain bits from several Patreon posts (they also got an extra post covering the development of this board). This also includes access to my Patreon only Discord server for even more regular updates.

Sunday, 21 July 2024

Penultimate Cartridge Repairs

I am currently in the middle of development of something new and exciting, and writing lots of posts about that for my Patreon supporters. I can't post any of them on here until it's complete, so today I am raiding the Patreon archives again. This time a post from January 2023, with some 2024 updates at the end. As the Penultimate +2 Cartridge was being developed, I was sent an interesting bundle of boards from TFW8b.....

Since the Penultimate Cartridge was launched in 2016, there have been very few problems. Most of the ones we have seen have been down to VIC20s themselves, and when the dubious 245s or in most cases 138s were replaced, all was well again.

For example:

and also

All boards are tested at several stages during production, so we can be confident of them working, and I think of the few original Penultimate cartridges returned, none were actually found to be faulty.

A few boards failed programming or testing, or were rejected due to physical damage (we lost a few buttons on the corners of the boards).

And here they are. The entire total of rejected Penultimate Cartridge boards from the millions we have sold*.

* OK, not millions, but still quite a lot.

A total of 9 bad boards over 7 years. That's not bad going is it?

Some have been reworked, or raided for parts already, but TFW8b has sent them all to me to see how many I can actually get going (or ultimately raid for parts for PU+2 prototype boards).

I can rule one of them out at the first stage. It has had it's microcontroller and RAM removed, so it does not appear to be worth investigating further. I'm having those buttons though to fix one of the other boards.

So that leaves 8 boards.

I thought the best place to start was trying to program the microcontrollers, see how many of those were good.

I did make a nice pogo-pin programming jig, but it's been so long since I dealt with one of these boards, I couldn't find it, so I made a bit of a lashup with a cut down ZX Spectrum edge connector (and I have actually been using this since then, never did find the old one)

Of the 8 boards, 7 programmed correctly. One failed to detect the chip.

Not detecting the chip either means a bad connection, bad microcontroller, or possibly a bad crystal.

Straight off the reel, the chips are set to use the internal oscillator, but when programmed, are set to use an external crystal. If the crystal is bad, they will program the first time, but then do not run and cannot be reprogrammed.

That had clearly had some rework done (a previous revival attempt?). I probed around and found the crystal wasn't oscillating. Probing further found no continuity between the crystal pin at the top and the microcontroller.

I carefully removed the crystal and checked underneath, and the trace was broken where it connected to the pad. I lifted it at the corner to make it easier to see. (cleaning the chip has also made it easier to see the 2014 date code, so this must have been one of the very early boards, possibly one of the hand assembled prototypes?)

I scraped away a bit of the trace and soldered it back to the pad and carefully fitted a new crystal in place. May as well since the previous one had been trough several heat cycles.

(you can just see here the edge of sticky tape I had put on the boards to protect them from scratches from the edge connector. That is what I was writing on, I wasn't directly graffitiing on the boards.)

Success, that's now 8 boards that have programmed correctly, so time for the next stage of testing.

I'll start with the four boards with all the parts intact.

I installed known working chips in the sockets on the first board and fired up the VIC20.

That's a good start, so I exited to BASIC and ran the test program (this was before the days of the built in self test)

I left that running for quite a few cycles with no problems. I also ran through several games to test some of the different modes (Cheese and Onion, a text adventure and an Atari game).

And the next two did the same.

Three working boards.

The final one of the four failed the memory test.

I spotted a fleck of what looked like hot glue? on the back, that might have stopped it getting a proper connection on that pin. With that cleared, it passed the test. (the very early "Caramac" coloured cases were hot glued together, the second revision hold together fine without even needing the screw. This must be another early board.)

All of those four are now working, one more needed only a reflow of the pins and a clean up.

Next, two boards with sockets, but with some damage and no buttons.

Both had modifications to the ROM socket for some reason or other, so I couldn't test that, but I was able to run the board with just the RAM enabled. With the correct series of magic POKEs, I was able to enable the RAM.

They both passed the RAM test designed for the Max RAM boards.

Finally, two boards with the sockets removed. The microcontroller had programmed, so these were a potential good source of parts. I decided to fit some sockets for the GAL chips and test those to make sure the microcontrollers and RAM was working.

Again, they both passed, so more chips for harvest.

So after all that. All the boards actually worked, or could be made to work. All the damage was mechanical, either boards damaged in transit, or ones with bits removed.

Goes to show, if anyone does have a problem with a Penultimate Cartridge it really isn't likely to be the cartridge itself at fault.

2024 Update.

The parts from those boards went to make the Penultimate +2 Cartridge prototypes, (this is my development version of the PCB, with thinner traces, bigger parts, no gold edges and a different fonts etc.)

Which as usual, started off looking quite neat.

But it doesn't last long.

And indeed, that mod didn't last long, and later got reverted. I remember being very pleased with the track repair.

And rather disappointed when I turned out I had to undo it again.

One or two other mods on this one.....

Since the release of the Penultimate +2 I think there has been one return which turned out to be a flaky crystal. It would work for about half an hour, then start acting up, but other than that, we can still be very confident of all the production boards that go out.


Advertisements

The Penultimate +2 Cartridge is currently at £49.99+VAT

But wait!

Q:Would you like £5 off a Penultimate +2 Cartridge? (or anything else from TFW8b.com)

A:YeahYeahYeah

Well, use the code "A:YeahYeahYeah" at checkout.

See this (sort of) helpful diagram drawn by Rod himself.


There is also my store with the full range of Minstrel and Mini PET kits and accessories, things are on the change there, but best just to contact me using the link top right of the blog page, and tell me what you want and where you are and I can send you a PayPal invoice. Hope to have a better solution soon.

All the links can be found here:

Patreon

You can support me via Patreon, and get access to advance previews of posts like this and behind the scenes updates. These are often in more detail than I can fit in here, and some of these posts contain bits from several Patreon posts (they also got an extra post covering the development of this board). This also includes access to my Patreon only Discord server for even more regular updates.